Brew your best beer EVER. Start your Free Trial of Brewer's Friend today! Sign Up ×

Yeast terminology attenuation and flocculation

Saturday, May 30th, 2009

Flocculation describes the process of yeast sticking and clumping together once all the nutrients have been used. As the yeast gathers, they become too heavy to remain in suspension in the beer, and fall to the bottom of the fermenter, mixing with the sediment and nutrients. Home-brewed beer can use yeast to carbonate bottles (aka bottle conditioning), so this process also occurs in the bottles, causing the yeast and ‘trub’ to form a thin layer along the bottom of the bottle.

The strength of this “clumping” is determined by a host of factors from O2 levels in the beer, temperature, and nutrient levels, but the primary factor seems to be the strain of yeast itself (in truth, flocculation is still being researched, and has a few mysteries remaining.) Flocculation occurs near the end of the yeast life cycle, so a yeast that flocculates early will not convert as much sugar, and result in a lower-than-expected alcohol content. Strong flocculation gives a clearer beer, while weaker flocculation can lead to a cloudy beer, sometimes with a yeasty taste. Hefeweizen yeast is a good example of a strain that has very low flocculation, meaning a lot of it is left behind in suspension. Traditional non filtered hefeweizens should look cloudy from the yeast (not the wheat as some might think).  The clove like signature flavor in a hefeweizen comes from the yeast.

Attenuation describes the overall efficiency of a yeast strain in converting sugars into alcohol under a specific set of conditions. Higher gravity beers require the use of yeasts with higher attenuation rates. Attenuation is listed as a percentage, meaning the percentage of sugars present in the wort that get converted into alcohol. Most beer yeasts have a 65-80% attenuation rate. Wine & mead yeasts have a higher attenuation rate. The exact attenuation rate can be found for a given beer by comparing the starting (pre-yeast) original gravity (OG) to the final gravity (FG) of the finished beer.

When selecting yeasts, the beer style should be considered. When brewing a Belgian Witbier, a yeast strain with a 65-70% attenuation rate would be appropriate. A “stronger” yeast (higher attenuation) could be used, resulting in a higher alcohol content, but the overall flavor & style of the beer would be “off” from the standard. The attenuation for yeast for an English ale would be lower than the yeast for a Belgian brown.

The attenuation of a particular batch is affected by anything that would affect the health of the yeast. Unexpected flocculation, changes in temperature and insufficient nutrients can all lower attenuation.

Basics of Hops in Brewing

Saturday, May 23rd, 2009

Hops contribute four elements to beer: stabilization, bitterness, flavor, and aroma. Using the right hops, added to the boiling wort (pronounced wert) at the right time, is every bit as crucial as using the right grains or yeast.

Hops resins contain two types of acid, one (Beta) that contributes to aroma, and the other (Alpha) that contribute to the bitterness of a beer. Commercial hops are air dried prior to packaging. The resins require boiling to fully release the acids. The higher the percentage of Alpha acids in your hops, the more bitterness will be imparted, leading to a higher IBU value for the beer. Usual time for boiling is 60 minutes.

Hops also contain essential oils that contribute to aroma and flavor. These oils are aromatic (like the oils in coffee), which means they will evaporate out of boiling wort over time. Hops added for aroma are added last in the boil, and usually boiled for five minutes or less because “hop flavor” tends to boil out within 15 minutes. Over-boiling these hops defeats the purpose of adding them. Over-boiling bittering hops has no effect, since the bittering acid isn’t aromatic and won’t evaporate out in a boil. The cutoff point between a bittering hop and an aromatic hop is somewhere around an alpha acid level of 8%, but some higher AA variates are dual purpose.

Some styles of beer call for even more hop flavor and aroma, such as India Pale Ales. In order to increase the ‘hopiness’ of a beer further, hops can be added after the wort is chilled and left to ferment with the wort through the primary fermentation. This process is called “dry hopping”; the un-boiled hops soak in the fermenting beer for weeks.

If you have to substitute because your preferred variety of hops are not available, bittering hops are the easiest to substitute, since you’re comparing the IBU and Alpha Acids By Weight. (often noted as “Alpha %”) Flavor & aroma hops are trickier to substitute; the best strategy is to pick a hop from the same family (American, English, German, Saaz, etc). Changing the hop used in dry-hopping has an even larger impact on the finished beer, so even more care should be used.

The next choice a home-brewer must make is picking between hop pellets and dried hops. If you live in the right part of the world, you can even use fresh hops in your beer; as you might expect, the fresher the hop, the more aroma and flavor it provides. Dried hops are preferred, but may not be available. Hop pellets are hops that have been dried and compressed; they have the advantage of being small and easy to add down the neck of a carboy, but aren’t as good for aroma and flavor hops.

Hops can be added directly to the boil as loose leaf or placed inside a ‘hop sock’ for easier cleaning afterward. Use the same rules as making tea: wait for the wort to reach a roiling boil before adding the hops. If you do use a hop sock, consider adding an additional few minutes to the boiling time, especially for your bittering hops, as the hops won’t be able to circulate as well inside the sock.

At the end of the boil, strain the boiled hops out prior to fermentation. You can sparge the hops by gently pouring water over the boiled hops, and applying gentle pressure with a spoon or other tool. While it’s a good idea to sparge flavor & aroma hops, if your beer only has bittering hops, you can safely skip this step.

This site maintains a hops alpha acid table.

Beer styles and relative CO2 levels

Saturday, May 16th, 2009

To begin, consider a brief refresher from chemistry class. Gases dissolve into liquids; the amount of gas that can be dissolved into a liquid is inversely proportional to that liquid’s temperature. At one extreme, boiling liquids contain very little dissolved gases; most home brewers know this, either directly or indirectly from having to oxygenate their boiled wort before adding yeast. But there are two other stages where we have to consider carbonation levels & temperatures.

The classic axiom for bottling home-brewed beer is ¾ cup of dextrose / corn sugar (or 1 cup of malt extract, or ½ cup of honey) for a 5 gallon batch, leaving 1-2” of air at the top of the bottle, regardless of size. Home brewers are strongly urged not to exceed that amount of sugar, as too much sugar leads to excess pressure and potentially exploding bottles. This one-size-fits-all approach will work for novice and intermediate home brewers, but for more exotic beers, or for more advanced brewers, there is room for more variation.

First, consider the style of beer. Most European Lagers and American Ales have the same carbonation levels, but there are exceptions. Porters & Stouts, along with British ales, tend to traditionally have lower carbonation levels, with Belgian ales lying between the Porter/Stout and the American/European beers. A few beer styles, such as fruit Lambics and German wheat beer, have very high carbonation traditionally.

Next, consider the bottling temperature of the “green” (uncarbonated) beer. A colder bottling temperature means more CO2 is dissolved in the beer. A “green” Lager kept at 40 degrees F will have almost 50% more CO2 already dissolved than a “green” Ale kept at 60 degrees F, which goes a long way towards explaining why a finished Lager often has more foam than a finished Ale.

Finally, consider carefully modifying the type amount of bottling sugar. Because even small changes can result in a big difference, consider using dried malt extract, or even liquid malt extract instead of sucrose, as these types of sugars are less efficient for the yeast, and gives you the brewer a little more room to work within. Since few home brewers attempt Lambic-style beers, mostly you’ll be reducing the amount of bottling sugar for your Belgians, Porters, Stouts, and British Ales by a few teaspoons, down to an absolute floor of ¼ cup of dry malt extract for a 5 gallon batch.

There is another way to modify the amount of CO2 in bottled, home brewed beer. Leaving less air in each bottle causes pressure to build up more quickly; increased pressure results in reduced yeast activity, and thus less CO2. Conversely, leaving more air in the bottle will cause faster fermentation and more CO2, but more pressure inside the bottle means more risk of exploding bottles, and safety has to be a priority in this case.

There’s something here even for the non-brewers: what temperature is best to serve beer at? Remember, the temperature of the beer determines how much CO2 is dissolved, and how much foaming will occur. Beer styles with less CO2 can be served at a higher temperature, because there’s less CO2 dissolved in the beer; serving these beers at a colder temperature means more of the CO2 is dissolved, and less will be available to provide effervescence and foam. A Stout served at near-freezing temperatures will fail to produce a solid head, and may even taste flat. Conversely, a Lambic served at room temperature will bubble & foam like champagne or worse. This is why many of the English bitters are served at ‘cellar’ temperature (55F), which is warmer than fridge temperatures.

First Wort Hopping

Saturday, May 9th, 2009

Brewers are always interested in improving the flavor and aroma of their beer, and there seems to be an endless array of techniques by which to accomplish this. One technique that is receiving much attention is first wort hopping. Also known as, and referred to as, FWH in most brewing circles and software applications.

First wort hopping is the method by which a hop addition is added to the boil kettle prior to lautering your grain bed. This allows the hop oils to steep in the 150F-160F wort during the lauter and then be boiled for the entire duration of the boil. There are complex reactions occurring in the hop oils during this low temperature steeping that are not well understood, but the effect is unmistakable. FIG 1.

first wort hopping
Fig 1

This process is well suited for beers where you would like to accentuate the hop aroma and flavor of your beer, for obvious reasons this is probably not a great match for a malty Marzen or malty Holiday Ale.. FWH’ing provides the beer with a much more refined bitterness and flavor, it is sometimes referred to as a “round” flavor, less sharp.

Though the hop utilization is generally about 10% greater than a typical hop addition added at the beginning of the boil, the bittering perception is many times said to resemble that of a 20 minute hop addition. For this reason, FWH’ing generally does NOT take the place of your bittering hop additions. There are a few simple FWH’ing rules, but these are by no means limits to FHW’ing, just general guidelines.

Simple First Wort Hopping Guidelines:

  1. Do not alter your bittering additions, whether they be 60, or 90 minutes. The increased utilization is offset by the more refined bitterness and flavor of the addition.
  2. Use noble or low AA hops with a low cholumene level for FWH’ing. Some claim that high AA bittering hops utilized in this manner create a less pleasing flavor and bitterness than do low AA or noble hops.
  3. Use the recipes late addition hops (0-20 minute additions). The flavor and aroma from the FWH addition is a suitable substitute for these additions.
  4. Use approximately 30% of the total hop bill, for FWH. This 30% will constitute the 0-20 minute hop additions from the original recipe.

The afore mentioned “rules” are a general guideline for FWH’ing, but they are by no means the limits of this method. I have brewed an APA that uses ONLY a FWH addition for bitterness and it is one of my favorite beers, so you can feel free to experiment. Until you feel comfortable with the FWHing technique, try the afore mentioned “rules” and then branch out once you get a feel for what it contributes to different beer styles.

Partial mash and extract brewers can also experiment with FWH’ing in their beers!. The key here is to realize that the FWH is dependent on the hops steeping for a time in 150F-160F wort. In the case of a FWH’ed partial mash the hops could be added to the wort immediately after the grains are removed. Steep the hops for 20-30 minutes prior to the boil to mimic the time interval that would take place during an all grain lauter. After this steep, then boil as usual and make your usual hop additions.

To use this method in 100% extract brewing you will have to heat the water + extract wort to 150F-160F and allow the hops to steep in this warm wort for nearly 20-30 minutes, this will closely mirror that of FWH’ing in an all grain brew. After this steep, then boil as usual and make your usual hop additions.

Yeasts the difference between ale and lager

Sunday, May 3rd, 2009

Beer snobs will insist that there are truly only two types of beer: ales & lagers. While it’s amusing to hear them explain why a German Dopplebock is a lager while a Wietzenbock is an ale, the truth is that they’re not actually talking about flavors or styles, but yeasts.

Yeasts are living organisms. The distinction between ale yeasts and lager yeasts is based on the temperature range at which they are most active, and where in the wort-suspension the yeast concentrates. Ale yeasts are top-fermenting. During the most active stages of fermentation, usually within the first 5 days of pitching (or adding) the yeast to the wort, ale yeast is visible on the surface of the beer, amidst the foam and bubbles. Lager yeast is active at the bottom of the beer, and is easily missed after the first week as it mixes in with the sediment.

The top- versus bottom-fermentation is an aesthetic difference though; the real distinction is the temperature at which the beer should ferment. Ale yeasts ferment best between 60 -75 degrees F; (12-24C) going below this range slows fermentation, causing the yeast to be “sluggish”, while going above the range increases the risk of bacterial growth and other contamination, as well as causing off-flavors from the yeast. A friend’s batch of hefeweizen suffered because the home thermostat was set to cycle to lower temperatures at night.

Lager yeasts are a slightly different animal. While they ferment best between 35 & 55 degrees F (2-13C), for the first day, the temperature should be in the ‘ale’ range. This is because of the life cycle of yeast: for the first 12-24 hours, the yeast is converting starches in preparation of reproduction and releasing CO2. After this initial “blow off” is done, the beer should be placed in a temperature controlled environment (like a refrigerator) and gradually chilled down to lagering temperatures. Note ‘gradually’; when cooling the wort, the goal is to chill quickly to limit exposure to wild yeasts and bacteria. When chilling the beer to lager it, no dramatic steps are necessary, as the beer should already be in a carboy with an airlock. Sudden, rapid changes in temperature can ‘shock’, or even kill, yeast. Smaller batches are inherently more susceptible to temperature shock due to the smaller volume of liquid.

Some people prefer to make a lager yeast starter at room temperature, then pitch into cooled wort from the kettle, then move the fermenter into the fridge. Lager yeast may also need a dialectal rest, which involves raising the temperature into the 60-65F range for a couple days to let the yeast clean it self up. Diacetyl is a butterscotch like flavor and can be seen as a defect in certain types of lagers, especially light lagers.

Lautering Equipment False Bottom vs Manifold

Saturday, May 2nd, 2009

There are some distinct differences between the these two popular methods of lautering your mash that you will want to consider prior to building your mash tun. As with most brewing equipment or brewing methods, you need to determine which one will provide you with the results that you desire.

A false bottom is simply a plate, generally stainless steel, that is filled with hundreds of uniformly spaced small holes. These are generally round, limiting the user to a round mash tun.

false bottom in mash lauter tun
Fig 1: Example false bottom.

A manifold is simply a series if pipes, either CPVC or copper, that has been drilled or slotted with a saw. These are laid as closely to the bottom of the mash tun as possible with the holes or slots facing downward. A manifold can be constructed to fit any size or shape mash tun.
copper manifold in mash lauter tun
Fig 2: Example copper manifold which fits into cooler.

Time to explore some facts!

Let’s begin with a list of FACTS about false bottoms, their Pros and Cons.

PRO’s for false bottoms:

1. They are readily available, professionally manufactured
2. They are nearly 100% efficient
3. They will lauter nearly 98% of the grain bed uniformly
4. Grain bed depth barely affects their efficiency
5. They are more efficient than manifolds in all cases

CON’ s for false bottoms:

1. More prone to stuck sparges than manifolds
2. They are difficult to make yourself
3. They are only manufactured to fit ROUND coolers or buckets

Time for the FACTS about pipe manifolds, their Pros and Cons.

PRO’s for pipe manifolds:

1. Though not commercially available, they are very easy to manufacture at home
2. They are nearly 93% efficient
3. They will lauter nearly 93% of the grain bed unifromly
4. Stuck sparges are very rare with a properly built manifold

CON’s for pipe manifolds:

1. They are never as efficient as false bottoms
2. Grain bed depth with affect the efficiency of the lauter
3. Pipe spacing will affect the efficiency of the lauter
4. More prone to channeling (fluid taking path of least resistance, also rinsing less sugar)
5. Cleanup can be tiresome as it should be taken apart and rinsed completely.

False bottoms are pretty simple, there is little left to the imagination or to the design, this cannot be said for the construction of manifolds. There are a few principles that need to be discussed if you want to get the most out of your manifold.

#1. Plan your MLT size to coincide with having a deep grain bed, the deeper the better. This will serve to improve the efficiency of any manifold that you construct. A 12” or deeper grain bed is preferred.

#2. Plan the layout of your manifold pipes carefully, optimum spacing is about 2” to 2.5” between pipe centers, OR 4x the pipe diameter. (1/2” pipe spacing is optimal at 2” between centers, 3/8” pipe spacing is optimal at 1.5” on center etc…)

#3. Pipe spacing from the walls of the MLT should be planned at HALF of the optimal center to center distance from #2 above. (1/2” pipe spaced at 2” between centers, would be spaced 1” from center to the edge of the inner wall, 3/8” pipe would be spaced at .75” from the pipe center to the edge of the inner wall etc…)

The afore mentioned design rules will allow for the most efficient manifold for YOUR mash tun. The principles that govern the design needs for a specific manifold are related to fluid dynamics, fluid flow, path of least resistance and creating an even flow velocity around EACH tube in the manifold.

Adding Sight Gauges on A Budget

Sunday, April 26th, 2009

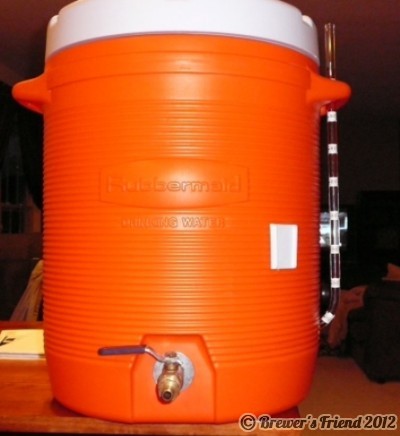
$3.26 Sight Gauge modification for hot liquor tank (HLT) or mash lauter tun (MLT).

This article explains how I added a sight gauge to a 10 gallon hot liquor tank (HLT) cooler as well as an identical 10 gallon mash lauter tun (MLT). Gas fired vessels may also be converted in this manner, but use caution! Many polycarbonate tubes are rated up to only 200F, so their use on boil kettles can become a concern if the heat from the gas burner moving up the side of the kettle exceeds this value to any large degree. The temperature of the liquid may be 200F-205F, but the heat licking at the side of the kettle may be much hotter. This parts list for this modification are suited for the mash lauter tun or hot liquor tank – NOT THE BOIL KETTLE!! When adding a sight gauge to a boil kettle, the tubing needs to be rated for higher temperatures, and different gaskets and fittings are needed to withstand the higher temperature and pressure.

This article demonstrates heating and bending the plastic tubing.  I took care to follow safety precautions such as wearing thick gloves, eye protection, not drinking alcohol while doing this mod, staying away from flammable materials, and I kept a fire extinguisher on hand.   Now that we are past the safety warnings we can get on with the mod, which comes out looking like this:

sight gauge for brewing

Parts List:
Qty: (1) ½” OD x ¼” ID polycarbonate tube approx. 19” in length (McMaster Carr $1.65/foot)
Qty: (1) #5.5 drilled gum rubber stopper (LHBS $.65 each)

Tools Required:
Hack saw/cutoff saw/Dremel tool
Propane Torch/Deep Fryer
1” hole saw/1” step drill
Label Maker
Drill

Step 1. Properly locate the hole where the stopper and sight gauge will enter the side of the vessel. This does not need to be at the very bottom of the vessel, but rather at a location where the minimum fluid level required in the vessel can still be measured. For me this is near the 1 gallon mark. I drilled a 1” diameter hole on center at this location. Fig 1

drill hole for cork
Fig 1

Step 2. Determine the length of the tubing which to cut. I was sure that the tube reached nearly to the top of the vessel, and that there was ample length after the “L” bend at the bottom to get the tube into the vessel and into the stopper. (The sidewalls on some coolers can be as thick as 2”-3”) Cut the tubing using a fine tooth hack saw or some sort of cutoff saw. A rotary tool such as a Dremel would work as well.

Step 3. Determine where to bend the tubing, this will be 2”- 4” from the end of the tubing depending on your application. I marked this location with a permanent marker. Fig 2
site gauge tubing
Fig 2

Step 4. The polycarbonate tubing will need to be heated at the end that you intend to make the 90 degree bend. This is where the propane torch, OR deep fryer will work. Using a torch will take more skill than using the deep fryer method, and requires heating the tubing gently and evenly.With the deep fryer, I set the temperature to 350F. When the oil was heated I inserted the end of the tubing intended to be bent, submerging it just past the point where I wanted to make the bend. In either case, 350F polycarbonate retains its integrity, but is very pliable and HOT! I used an oven mitten to protect my hands. After the tubing was made pliable I needed to move fairly quickly make the bend, I used the edge of a cutting board with a ½” radius corner as my guide. This allowed a uniform bend and assured a 90 degree angle. Fig 3, Fig 4
site gauge fat fryer
Fig 3
site gauge bent ready to install
Fig 4

Step 5. Then I let the tubing cool!

Step 6. ASSEMBLE: Inserted the stopper from the inside, into the hole that I drilled in Step 1, then inserted the bottom of the “L” tubing into the stopper in the wall of the vessel. I though of using an eye bolt to support the top of the gauge, but then I realized I can simply use the existing cooler handle.

Step 7. CALIBRATE: I filled the vessel one gallon at a time, marking the level of fluid in the sight gauge as I went. Using a label maker I marked these locations accordingly so that I can now precisely measure strike water, infusion water and sparge water quantities quickly and easily. Fig 5
site gauge fitted to cooler
Fig 5

New Belgium Brewery Tour

Saturday, April 25th, 2009

I remember when Fat Tire ale came out and how awesome it was. New Belgium Brewing has carved out a respectable niche and I’m really glad I got to visit. It is located in Fort Collins, Colorado, about a hour north of Denver. By the way, the town is nick named ‘Fort Fun’ by the local college students who like to frequent New Belgium and two other local breweries nearby that give free tastings – daily! Essentially if you visit Fort Collins, no need to buy beer, you can get totally loaded for free on high quality brew.

New Belgium brewery

New Belgium brewery

The place is packed all the time (we went there twice). When you walk in get ready for a very youthful, loud, fun atmosphere. Beer everywhere – it is all they serve! You get to choose four 4oz samples from their menu, which explains the different varieties. You only get one shot per day so pick wisely. I was lucky to share with my wife. We both left there in high spirits.

New Belgium beers

New Belgium beers

Their lambic style was right in line with barn yard like flavors and ripe fruit. They also had a Belgian golden ale which was delightful, hints of white wine, but a mild bitterness, very refreshing. I was not a fan of the 1554 Ale, it seemed too light in body for such a dark beer. Apparently they used lager yeast on it, but I was searching for malty body and my tongue did not find it.

They also offer guided tours. I took some snaps of the behind the scenes.

New Belgium brewing lab

Yes, those are cans, New Belgium is packaging in cans these days. Who’d a thunk it??

New Belgium stainless steel fermentors

I sure would love to have a stainless steel canonical fermenter of that size (or any size for that matter)!

New Belgium cellar

I don’t even know what these pipes are for but they look shiny and must be important.

I highly recommend visiting this brewery, it was a lot of fun, I learned a few things, and I got some free beer. Did I mention free beer?…..

By the way, if you want to piss off a Belgian, mix up the grammar. Say ‘wow you are from Belgin‘, man I’ve heard ‘Belgium beer is CrAzy’. As I was writing this post I mixed it up myself several times.

One of the things I learned there, the host/bouncer will “bounce you out of here like a golf ball in a Walmart parking lot” if he doesn’t like you. He felt obliged to let the entire room know this at one point. Thanks for reading!

Click here to read about the Coors tour we took on the same trip.

Baby Hops Sprout Pictures

Sunday, April 19th, 2009

After only three weeks of putting hops rhizomes in the ground they are already sprouting!  Check back on the website for regular updates. Growing hops is easy and so much fun!

baby hops
Cascade Hops Sprouts 1 – After 3 Weeks

hops sprout
Hallertau Hops Sprouts – After 3 Weeeks (about 5 inches tall)

According to Fresh Hops we are not to prune anything off the baby hops. When they are big enough I will train the strongest shoots onto a climbing line attached to the trellis. Thankfully due to the Oregon climate, I have not had to worry about watering them as it has rained almost every day! If it gets dry I will gently wet them down with the hose, but I won’t over do it.

We put in six new hops plants this year. One Nugget, one Magnum, one cascade, one Kent Goldings, and two Hallertau. As I understand it, Hallertau (aka Hallertaur) is being pulled by hops farmers in favor of higher yield, higher alpha acid varieties in Oregon. This concerns me as Hallertau is a noble hop variety and one of the best for German lagers and Pilsners. Mt. Hood is a substitute for Hallertau, but its not the same. The lagers I have made with Mt. Hood turned out great, but there are differences. Across the batches I have brewed, Mt. Hood is cleaner smelling and tasting, while the Hallertau adds a more floral scent and subtle complexity to the flavor of the beer (the kind of thing money can’t buy). I am growing Hallertau for my personal supply so I ensure myself access to the variety.

For information on how we planted these hops rhizomes see this article on planting hops.

Cold Crashing Ales A Way to Clarify Beer

Saturday, April 18th, 2009

Many homebrewers are interested in achieving that sparkling clarity that they see in mass produced beers. A clear beer doesn’t taste any different, and if it is free, your friends won’t be complaining if it is a little hazy! Clearing your creation will further highlight the care and effort that you put into producing it.

Clearing beer with cold temperatures is easy and effective, if you are patient. Ferment your beer as you always do, being sure that you have reached FG and that the beer is ready to be bottled or kegged. Place the fermentor in your lagering/fermenting refrigerator for a minimum of one week at nearly 38F. Given more time, more of the haze producing proteins will coagulate and settle out.

During this time at cold temperatures, proteins and yeast will be settling out of the beer, as they do when you place your bottles of hazy beer in cold storage for long periods. Temperature and time are your friends when you are cold crashing beer. After a minimum of one week at about 38F you can rack your beer off the settled yeast and trub and either bottle or keg it.

If you are bottling your beer, prime the beer normally but be sure to place the bottles in a 70F climate to ensure that the yeast has an optimum temperature at which to carbonate your beer.

If you are kegging your beer, simply transfer the clear beer to an awaiting keg. Since the beer is at or near your serving temperature this is a great time to apply pressure and begin to carbonate. CO2 does not dissolve well into warm beer, but at nearly 38F you will be able to properly carbonate your keg in as little as 24 hours.