Hops Growing - Brewer's Friend
Brew your best beer EVER. Save 10% on Brewer's Friend Premium today. Use code TAKE10. Sign Up ×

Archive for the ‘Hops Growing’ Category

Drying Hops Using a Food Dehydrator – Great Results
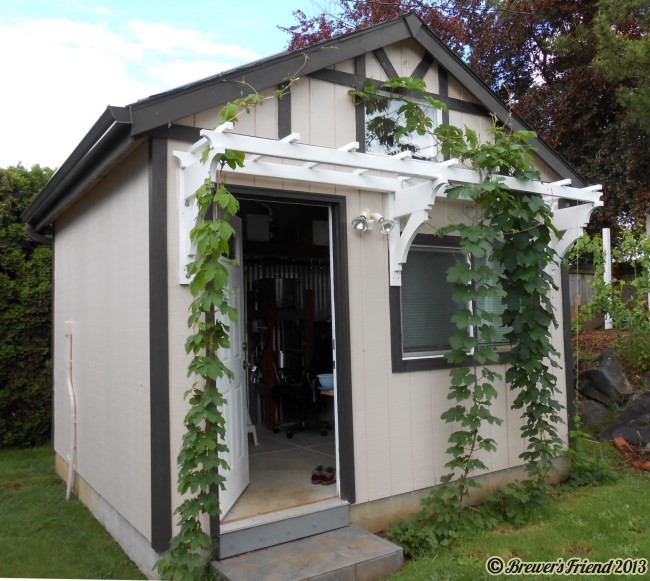
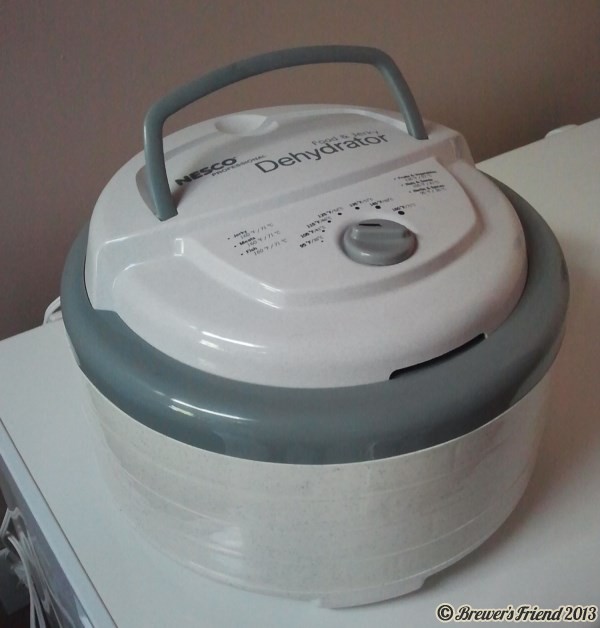
Friday, September 6th, 2013

This year for drying my home grown hops I commandeered the household food dehydrator. It works like a charm. Makes the shed smell AMAZING!!!

In previous years I used a window screen and box fan but I don’t see myself going back to that. The window screen and fan approach can take days and days to finish drying. The dehydrator was done in 8-9 hours on the lowest setting of 95F (35C).  This approach is faster and gives the hops a more uniform level of dryness.

drying hops food dehydrator

drying hops food dehydrator

Dry your hops at the right temperature:

At first I was worried a food dehydrator would be too intense in terms of heat and airflow on the delicate hop cones and essential oils.

After doing research about what temperature hops are dried at and double checking what temperature settings my food dehydrator had, there was no risk at all.  The lowest temperature I found mentioning hop oil vaporization was 100F [1]. On professional scale, hops are kiln dried between 130F (54C) and 145F  (63C). In the kiln they are layered up to 28″ high. The hops are then blended and dried for another 24-36 hours before being packaged [2].  Based on that, the 95F (35C) temperature sounded pretty safe.

drying hops food dehydrator at 95F

How long to dry for?

Every few hours I checked the cones to see how dry they were. After 4 hours many were still damp when I squeezed them.  After 8 hours all but one or two were completely dry.  Right around 9 hours in the dehydrator was perfect for this year’s hops harvest.

Other DIY approaches:

As I mentioned above, the window screen drying approach works but takes time. If you have a lot of hops to harvest it starts taking up way too much space.

Braukaiser has a great article on building a hop drying oast, which is a DIY 2×4 frame with a box fan built into it.  He says it takes about 3 days to dry the hops that way. He also points out that some essential hop oils actually vaporize at temperatures as low as 100F (40C). Drying the hops at cooler temperatures is beneficial.

How much can it hold?

This food dehydrator can fit a pound of wet hops comfortably.  After drying the weight was about 6 ounces. This was from one Chinook plant that grows vigorously up the front of the shed.

How to store and inventory the hops?

After drying I vacuum seal the hops into 2oz packages and store in the freezer. I also update the My Inventory section of my Brewer’s Friend account. I put the AA level at the low end of the spectrum for the variety. Since I’m flying blind in terms of AA levels I’m conservative.  Besides I generally use home grown hops for flavor or aroma additions only so the IBU impact is not that critical.

A fresh hop brew would have been another awesome way to use up a pound of wet Chinook hops, but alas all my kegs are full and the fermentation chamber is occupied with a lager right now. Not a bad problem to have.

Post by Larry

[1] Source: https://braukaiser.com/blog/blog/2012/12/09/hop-drying-at-home/

[2] Source:  Hieronymus, Stan. For the Love of Hops : The Practical Guide to Aroma, Bitterness and the Culture of Hops. N.p.: Brewers Publications, 2012. Print.)


Hops Trellis Ideas

Friday, August 2nd, 2013

There are no rules when it comes to hop trellis design. The higher the hops can climb the better, up to 18 feet, but even 8-10 feet off the ground is okay. The important thing is to make sure the hops have as much sunlight as possible.  Give the vines something to climb up as they are growing (rope, wire or twine works great).

Trellis attached to building:

Earlier this year the brew shed got a trellis upgrade. Last year the hops were right up against the siding which is bad for the paint and overall lifespan of the siding. With the trellis installed there is now about a foot and a half of airspace between the plant and the wall. The design was inspired by: https://www.blueroofcabin.com/2011/06/diy-trellis-over-garage-door.html

hops trellis on brew shed
March, 2013

hops vines growing on shed
May, 2013


growing hops in back yard
July, 2013

Note how the hops are getting a little tangled. It is the Chinook and Fuggle in the middle that are fighting. Originally I attempted to train the Chinook hop vine around the porch light. It worked for a few months but now that the plant is in full growth it is impossible to keep it away.  I will need to do some work to ensure that when I harvest I don’t mix up the varieties too much.  In retrospect planting the same variety in the middle would have been smarter.


Free Standing Hop Trellis:

A friend of mine has many trees in his back yard. That was nice because it kept the house cool in the summer, but didn’t give much opportunity to grow hops. Instead he built this free standing trellis in the front yard and had awesome results:

growing hops with free standing trellis

front yard hops trellis

Improvisation for growing hops:

Provided the hops have something to climb up the plant will figure the rest out. Hops can be trained to climb up a few feet and then horizontally like on a clothes line or fence.

growing hops with free standing trellis

growing hops on a clothes line

How the pro’s setup a Hops trellis:

The most efficient way to grow hops is to setup rows with the plants 5 – 7 feet apart allow them to climb up to 18 feet in the air. I’m envious of this, but it would look a little strange in the back yard.

hop farming trellis

hop farming countryside

For more reading on hops:

Some photos from Flickr creative commons:


Hops Harvest Complete

Friday, September 21st, 2012

The 2012 hops harvest is complete! Everything is packaged and dried.

The process is to first harvest the hops by hand picking. You can cut the vines down, but this year I decided to leave them up and use a small step ladder to reach the higher cones. My advice is to only harvest one variety at a time and keep track of where each variety is in the picking / drying / packing process.

hand picked hops


Then you want to let the hops dry for about 48 hours, until they are no longer moist to the touch.  I weighed a few of the samples before and after. There was about a 50% reduction in weight. This runs counter to the advice of using 4-7 times the normal amount when brewing a fresh hop beer…

hand picked hops

The false bottom came in handy for the smaller crops:
hand picked hops
When they are dry, weigh them out for packaging.  One of my recipes calls for 2 oz of Chinook, so I weighed out that amount for that particular bag.

weighing out dried hops for beer brewing

A vacuum sealer is a wonderful tool for this process.

vacuum sealing dried hops at home

preserving hops at home
I then label the bag, and put them in the freezer.

The inventory feature at the site helps me keep track of what I have.  I wonder if I will ever get around to using that 2010 Willamette??

home brewing inventory tracker


Here is the breakdown of what I got, and the order harvested in. It seems like Kent Goldings is always latest in the season to harvest.

  • Chinook – 10.5 oz
  • Hallertau – 10.2 oz (two vines)
  • Cascade – 2.2 oz
  • Zeus – 2.2 oz
  • Fuggle – 2.9 oz
  • Magnum – 1.6 oz
  • Nugget – 7.7 oz
  • Goldings – 5.25 oz
  • TOTAL:  42.5 oz = 2.65 pounds, @ $2.00 per ounce retail – about $85 dollars in hops, I’ll take it! You can beat the price of $2/oz if you buy in bulk.
Why such small yields on some of these? I’m not totally sure…  Here is what I observed. The Chinook plant is in the middle of the shed so it can grow the tallest  (13.5 feet). Nugget has the second highest path to climb. The other plants top out around ten feet. Based on my extremely small sample size, it appears the taller you can let the vines climb, the higher the yield. Watering was very consistent this year thanks to our soaker hose setup.  In terms of feeding the plants, this year I did only a couple treatments of miracle grow. Next year I will do more. I also plan to build a trellis on the shed to extend the reach of some of the vines.

Post by Larry


Big Hops Climbing the Shed

Saturday, August 11th, 2012

The hops are really climbing up the shed! Chinook and Fuggle are growing the best in the middle. Only two year old vines, I’m pleased and can’t wait to brew!

Next year a trellis is going up to keep the hops off the siding. It will look nicer, and be better for the siding on the shed. One thing I did not anticipate is how close the hops are getting to the porch light. Earlier this summer one of the leaves was touching the light bulb when the motion detector switched it on. It didn’t catch of fire thankfully, but it was withered and was dead the next morning. There is enough foliage now I think this hop plant is a real fire risk. So… in the mean time that light is shut off.

hops growing up shed wall

Here is how it looks from inside the shed:
hops through the window

Check out what was on one of the leaves:

hops leaf insect egg infestation

Bastards! These bugs seem to be gone, and I saw lots of lady bugs chomping away. Spider mites are the next big issue to worry about. I’ve been playing around with a hops spray program. I’ve tried various spray strategies, but the notes are not solid enough for a write up yet. We’ll see how the organic, non-toxic stuff does first.

Looking forward to harvesting and doing some home brewing in a few weeks!

home brew shed covered in hops


Hops Harvest Update

Tuesday, September 13th, 2011

It is time again to pick home grown hops. What a fun experience. The smell is just heavenly. In fact, I’m sure they have a section in heaven devoted to hops…

dried fresh hops

So far, the only vine ready to pick was Nugget.  We got 2.35 dried ounces out it.  That seems like a small amount compared to some sources that say you can get pounds of hops per vine. I’m not dissapointed, but I do plan to make some adjustments next year and see if I can increase the yield.

I did not use fertilizer, besides a shovel of steer manure in the spring on top of each crown.  I know I could have done better on watering. The hops and the garden both suffered through a few dry spells, which I’m sure reduced the yield.  Next year I plan to run a soaker hose hooked up to a timer so they get watered every morning – thanks to my friend Brian for pointing that one out!

The Nugget vine grew heathily, and was about 11 feet tall. It actually tried to climb up the roof but couldn’t hang on to the flashing.
nugget hop vine


This metal window screen set on top of my brew wagon makes a great drying rack.
nugget hop vine


The two Hallertauer vines should yield 3-4 ounces combined.  This year I decided against pruning and let it go wild at the base.  Last year was a poor growing year and I wanted to give the hops a chance to really establish a strong healthy root system. These should be ready to pick in a couple days.

hallertauer hop vines

Sadly the Cascade vine was infected with Spider Mites. Spraying the leaves with a solution of water and isopropyl alcohol every 3 days for about two weeks seemed to get rid of them.  However, there are not many Cascade cones this year.  BrewersFriend will post more about Spider Mites next spring.


Make sure to check out other articles in the Hops Growing category!


Time to order Hops Rhizomes 2011

Sunday, March 6th, 2011

It is time to order hops rhizomes for spring planting. The sooner you plant hops rhizomes, the sooner you can start growing hops vines and enjoying home grown hops in your beer. This year I will plant a few new varieties around the site where my brew shed is going up.

hops rhizome
Hops Rhizomes Ready to be Planted

Hops are propagated by a root cutting called a rhizome (as opposed to seeds or starters). The rhizome is planted in the ground and grows to become a complete hops plant. The new plant is essentially a clone of the mother plant. All rhizomes come from female plants which produce hops cones for brewing. Male hops plants have seeds in their cones, and are not the best for brewing with. It takes at least two years to get to full cone production. In the first year there will not be much of a harvest, maybe a half ounce of dried cones at best (in my experience). In the second year, get a bucket when picking the cones! The best time to plant a rhizome is right now, in late winter / early spring.

If you are going to buy rhizomes this year, make sure to check out:

The Thyme Garden

Thyme Garden

I ordered from The Thyme Garden before and have had good experiences. Here is a link directly to their hops page. They are an organic nursery and herb farm in the coastal range mountains of Oregon. They can’t ship to Washington because of a quarantine, but they do ship everywhere else in the US except Hawaii. Their prices are very reasonable, especially when you consider you are getting high quality organic hops.

I would plan the hops yard and dig the holes for the rhizomes the first nice day after you place your order. That way when the rhizomes arrive you can get them in the ground quickly, rain or shine. The surest way of killing the rhizome is to leave it in the fridge for weeks.

These Brewer’s Friend articles should be of interest if you have never grown hops before:


Planning Your Hops Yard for Home Brewing

How To Plant Hops for Home Brewing

I highly recommend growing hops. It is really fun and satisfying all around. Everybody loves to talk about hops even non-drinkers. The vines look great crawling up the house, shed, or custom designed trellis. Hops vines on the house, yeah, that is how life should be. Not to mention, beer made with your own hops is something to be proud of. Enjoy!

Brewer’s Friend received hops rhizomes from The Thyme Garden for review as part of this article and link exchange.


Hops Harvest 2010

Monday, September 13th, 2010

Anybody who grows their own hops should be watching the cones carefully and preparing for harvest. I pulled the trigger on the first part of my hops harvest today, September 13th 2010. I’ll do the rest of the vines this week.

If your cones are papery, spring back when squeezed, and showing brown on the tips then pick ’em!

hops picking and drying

What I use to dry my hops:

  • Window screen
  • Spare room to dry hops for a couple days, omg it smells great in there!
  • Fan (optional)
  • Vacuum sealer
  • Space in freezer

For more details on hops harvest, please see:
https://www.brewersfriend.com/2009/09/29/fall-hop-harvest-guidelines/

This year wasn’t a great growing season in Oregon, only half the tomatoes are ripe. Bah… On the upside, I’ve still got plenty of hops!

lager beer


Hops Growth Progress

Sunday, August 8th, 2010

Judging by my amateur hop yard (out front of the house) different types of hops grow at different speeds. This makes sense based on how many varieties of apples or tomatoes there are, but the variation in my hops was more than I expected. Harvesting everything at once does not appear to be the plan according to the vines. This will make it easier to keep the different varieties organized during harvest.

hops vines

#1- Hallertau

I am  amazed at the sheer number and size of the cones on this plant. It is going to be a great harvest. I have told my brew neighbors to come by with a bucket and grab some when they are ready.

hallertauer hops

#2 Cascade

This vine has probably 30 small cones the size of acorns. Not much aroma to the cones yet, they are very moist.

#3 Nugget

Nuggest was early to sprout and grows vigorously but is nowhere near the cone production of Cascade or Hallertau.

#4 Magnum

Still not quite up to the top of the rope yet. Plant looks healthy.

#5 Kent Goldings

This plant was the last to sprout. Last year it was the last to be harvested. Kent Goldings is on the far left in first image. It has not yet reached the top of the rope either.  It seems Kent Goldings is just naturally a few weeks behind the other varieties.

Harvest:

When the cones just start to turn yellow I will begin harvesting.  This will probably happen about a month from now.  The first step is to pick the cones and dry them. I use an old window screen. That process takes 3-4 days in my brewing room. By the end of the process the room smells like hops – delicious. Then I vacuum seal and freeze the hops. I will probably prepackage some for trading with my friends, in 4 oz bags.  I’m pretty sure I won’t be spending very much on hops for brewing in the future.

Brewer’s Friend has another good article on harvesting hops here.


Second Year Hops Growth Amazes Me

Monday, May 31st, 2010

The second year hops have really taken off. It is only the end of May, and two of the plants have already grown 10 feet! I am amazed at how quickly they have grown this month given we only had a few days of nice weather. For the most part is has been cloudy, grey, and 55F the whole month of May.

This should give hops growers who recently planted a better idea of what they can expect to see in subsequent years. My guess is the yield of cones will be much larger this year too.

second year hops tall

The two that are doing the best are Nugget and Cascade.

Magnum and Kent Goldings are the shortest at less than a foot. The Hallertau is doing well at about 3 feet.

At this point, the plants are practically zero maintenance. I have gone past and trimmed off the straggler shoots, leaving the two strongest to grow up the rope. I’m using a thick twine for some, and just regular twine for others. Watering has not been an issue because it has been so wet.


Hops and Dogs

Sunday, May 9th, 2010

Here’s a friendly notification to all brewers who own dogs:

If a dog eats hops it can be fatal!

A study conducted by the National Animal Poison Control Center, University of Illinois in Urbana in 1995 showed this to be true. Of the eight dogs, seven were Greyhounds, one was a Labrador Retriever, all cases were fatal. The dogs had ingested spent hops. Dogs are attracted to the sweet wort covering the hops.   Cases of dogs eating raw hops and getting sick or dieing have been reported on brewing forums, but this appears to be rare and no studies have been done.

dogs and hops

When a dog eats hops the onset of Malignant Hyperthermia occurs. Not to be confused with hypothermia, hyperthermia means the dog’s body overheats uncontrollably (2 degrees Fahrenheit every five minutes). The dog will begin panting heavily, display a rapid heart rate, and may have muscle spasms. This page has a report on how a dog was treated by a veterinarian in 2002 for such an incident: https://www.bme.ogi.edu/~ericwan/DOG/hops.html.

Types of dogs that have been impacted:

  • Greyhound
  • Labrador Retriever
  • Golden Retriever

Other breeds are likely susceptible to hops toxicity.

The best way to prevent against a dog eating hops is not to compost the spent hops or trub. Put the spent hops and trub in the trash or down the garbage disposal. Another approach is to setup a composting box so the dog can’t get into it.

When it comes to growing hops, if you want to be extra careful, plant them in an area the dog is not allowed in. If your dog is a digger or chewer pay extra attention to where the vines are planted. Also be careful during harvest when the cones are being collected and potentially dropped on the ground. A relative of mine has a dog and grows two hop vines in the back yard. This particular dog has an addiction to playing fetch and has never shown an interest in the vines or the hops.


Want no ads? Go Premium and unlock all our brewing tools!