Lagering - Brewer's Friend
Brew your best beer EVER. Save 10% on Brewer's Friend Premium today. Use code TAKE10. Sign Up ×

Archive for the ‘Lagering’ Category

Ensuring Success With Your First Lagers

Friday, March 20th, 2020

By Old Standby Brewing

You’ve been homebrewing for a while now and have pumped out some pretty tasty ales, impressing the hell out of friends and family; probably some IPAs, stouts, maybe even a porter or an ESB. Now you’re thinking you might want to try your skills at a crispy lager since you’ve been seeing them pop up more and more at breweries lately. Well, here are the most important things to consider before you take on the challenge of producing a tasty lager. The 3 most important things to remember when crafting a quality lager: Yeast, Temperature, and Patience! Let’s discuss further.

Your First Lager Recipe

Photo by Helena Lopes on Unsplash

Photo by Helena Lopes on Unsplash

As far as recipe development goes, it’s best to keep it simple in the beginning. Start with a basic malt bill that uses high-quality Pilsner malt and only small percentages of 1 or 2 specialty malts. Don’t worry about step mashing for this recipe. Pick a single infusion temperature (around 150°F) and mash in just as you would with all the ales you’ve brewed. Next, collect all that sweet wort into your kettle and once again, keep your hop schedule pretty simple. Refer to the BJCP guidelines for the lager style you’re brewing and keep the IBU in the suggested range. Perhaps you’ll want to use a noble hop variety or two here to really capture those traditional aromas and flavors. Once your boil is complete, which you may want to increase to 75 or 90 minutes to help reduce some off-flavors associated with high levels of pilsner malt, try to chill as quickly as possible and transfer to your sanitized fermenter. This was the easy part! If you’re looking for a great go-to lager recipe check out the Oktoberfest recipe created by Daily_Brewer. You can also check out the recipe section for more lager recipe inspiration.

Yeast Strains For Lagers

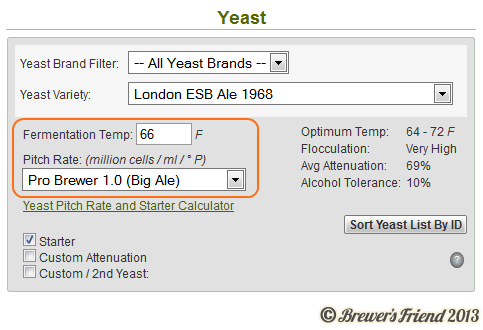
Here’s where your lager really needs some tender love and guidance to reach its full potential. Since lager yeast moves slower & does its best work at cooler fermentation temperatures, you’re going to want to pitch at least double (or maybe triple) the amount you normally pitch into your ales. This yeast also needs to be fresh so check the packaging dates. I try to use yeast that is dated within 1-2 months of my brew date. If you can’t get super fresh yeast, you’ll either want to purchase more or make a starter to get your yeast ready to tackle your lager. Remember, the yeast is doing all the work here, so make sure you’re adding enough to make your first lager attempt successful. I find that the pitch rate calculator on Brewer’s Friend is an excellent resource to determine how much yeast I actually need to use. It’s better to pitch more viable, healthy cells than not enough!

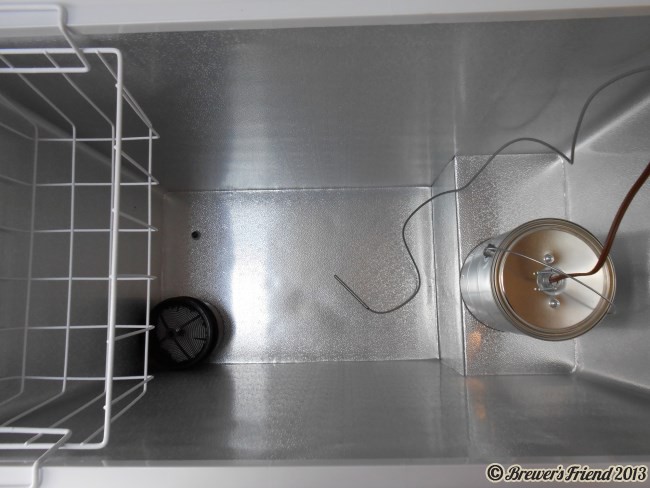
Lagers And Temperature Control

Now that you’ve brewed the beer and pitched plenty of fresh lager yeast, it’s time to create the optimum fermentation environment for your lager yeast to do the important work it needs to do. In order to create a choice lager, you have to be able to keep your fermenter at consistent lager temperatures for a long period of time. This means in the range of 48-52°F for 2 weeks and then down to almost freezing temps for a month or more. Each variety of yeast that you use will have an optimum fermentation range so use this information as your guide. If you don’t have the ability to control your fermentation temperature yet, you may want to consider not brewing a lager at this point in your homebrewing career. Sorry for the brutal honesty here, but I’m just trying to save you the heartache of your lager not turning out very good!

Stay Patient With Your Lagers

Sticking with the theme of keeping it simple, hold this temperature for at least 7-14 days before you do anything. Now, you’re going to be used to the activity that you’ve seen from your ale fermentations; you’ve possibly even blown a few airlocks off the top of your carboy, right? Well, lager fermentation happens much slower. Picture the sloth DMV scene in Zootopia or maybe even your last service call with your utility company! I digress. There are a few very well-known techniques for attempting to speed up your lager fermentation by some very well respected brewers, but I would urge you to keep it simple for your first lager and stick to a basic fermentation schedule which takes a few more days, but is less complex and doesn’t require you to take a bunch of gravity readings. Once your lager activity starts to really slow down after 7-14 days, raise the temperature of your fermentation vessel a few degrees, to the upper end of the range that we talked about earlier from the yeast manufacturer, and hold at this temp for at least another 3-4 days. This warming at the end of the fermentation will give your yeast a chance to clean up any off-flavors that have been produced. This is also known as a diacetyl rest. Diacetyl is a buttery flavor that you don’t want in your finished lager so be patient and give the yeast a chance to tidy things up. If you’re still seeing some activity in your blow-off, take a gravity reading to see if your lager is getting close to being finished. If not, give the beer a few more days to wrap things up.

Packaging Your Lagers

lagers in keezer

Photo by Adam Barhan via Flickr

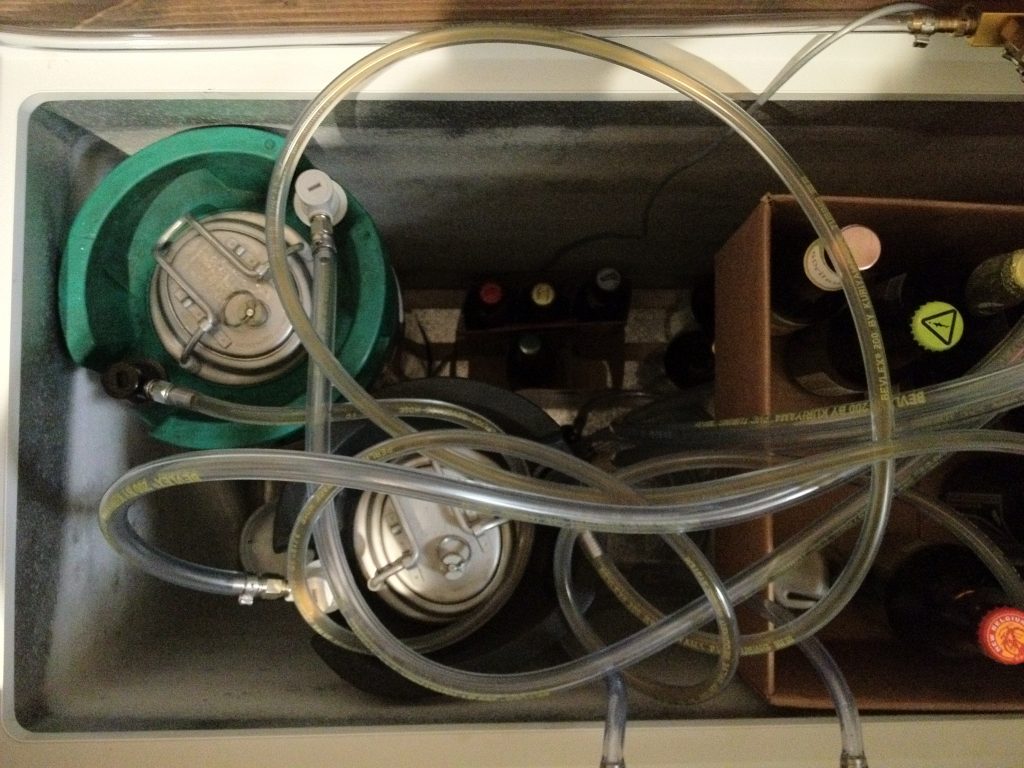
When all activity in your fermenter has stopped and you’ve hit your final gravity, it’s time to start cooling your beer down to start the lagering process. The word lager, or lagern in German, means “to store” or “to keep,” so really you’re just beginning to create the amazing flavors that you’ve come to love from a crispy lager. Lower the temperature of your fermenter about 2-3 degrees per day (patience, remember?) until you get down to 32-35°F and hold at this temp for as long as you can possibly stand it! Usually, 3-4 weeks is a good lagering time, but some of the more powdery yeast strains will need longer to drop out of suspension completely and some higher alcohol lager varieties will need even more time to fully mature. It is best to do this lagering phase with all of your yeast still in the fermenter, so don’t worry about racking into a secondary fermenter at this time. This allows your lager yeast to continue working its magic and creating the delicate flavors that you’ll want in your finished beer.

Now that you’ve completed your lagering stage you’re probably really thirsty and hopefully, you brewed enough ales before this lager to get you through the last couple of months! If you have the ability to keg and force carbonate your lager, you could be enjoying pints in just a few days. If you bottle condition your beer, then you’re going to have to wait a couple more weeks for your lager to fully carbonate. Bottle carbonation happens when the remaining yeast in your beer consumes the priming dextrose that you add at bottling, but since you’ve just finished a month-long lagering phase, there isn’t too much yeast left in your beer. So once again be patient because carbonation will take longer than usual. I probably don’t have to remind you, but I will anyway since you’ve come this far, sanitation is so important when making quality beer after your boil is complete. When you make a lager there is nowhere for off-flavors to hide, so make sure you’re cleaning and sanitizing everything that will come in contact with your beer once it leaves your boil kettle.

When it comes time to pour the first pint of lager that you crafted and cared for over the last couple of months, you’re going to have a new appreciation for lager brewing. Pay close attention to the delicate and subtle flavors of the pilsner malt and the traditional aromas of the German hops. Planning your next lager is a great thing to do while you enjoy your first few pints of the brew you just completed! Prost!


Controlling Fermentation Temperature with a Fermentation Chamber

Tuesday, October 8th, 2013

Controlling fermentation temperature is a key factor in making repeatable high quality beer. You’ll be amazed at how much your beer will improve by focusing on consistent fermentation temperature, and a related component the yeast pitching rate.

Yeast give off different flavor profiles depending on the temperature the fermentation takes place at. Consider US-05, a widely used dry yeast that is considered neutral in flavor. When fermented cool (around 62F), it leaves almost no flavor signature. When fermented high (above 68F) it can impart a peachy profile. Similarly many English ale strains will be somewhat neutral at the cooler end, but give off strong ester and fruit notes at the higher end. Belgian strains call for a higher temperature, because in those styles the fruitiness is desirable.

So, how can a home brewer guarantee temperature control during fermentation?

The answer is a fermentation chamber, which is made up of the following:

  • An insulated chamber.
  • A two stage temperature controller.
  • A cooling source – typically a freezer chest or mini fridge (which can double as #1).
  • A heat source – a lightbulb in a can works great.

Fermentation Temperature

Fermentation Chamber for Beer

Fermentation Chamber for Home Brew

Yeast Fermentation Temperature

Most temperature controllers come un-wired. If you know a little about electrical wiring, this makes a good DIY project. There are also a few models that come pre-wired, and some home brew stores provide this as a service.

Spending the extra $50 for a 2 stage controller with heating and cooling is well worth it. That way you can do lagers and ales, at whatever temperature you want, year round! It also gives a lot of flexibility. With a lager, the diacetyl rest is just a matter of turning up the set point to 65F for 48 hours. Want to cold crash that ale, no problem turn it down to 33F a few days before bottling. Just make sure to fit an airlock before cold crashing. If a blowoff tube is still set, the drop in pressure inside the fermentor will suck some of the fluid in the catch bucket back into the beer (yuck!).

My controller is a Control Products TC-9102D-HV Dual Stage High Voltage Digital Temperature Controllerproduct sheet and wiring diagrams can be found here. This model tends to change in price a lot. I got mine for $60 last year. There are cheaper options out there, but this one looked like the best compromise of build quality and price.

A note about the TC-9102D-HV and short cycling: make sure to set the differential on the cooling side to a value of 2. The thermometer tends to wobble between values (eg flip between 67 and 68 several times) before it will stay at the new value. Thank you to Foster82 for helping me out in the forum.

My heat source is an incandescent 40W light bulb in a paint can. The idea comes directly from brewstands.com. Incandescent light bulbs are being phased out, but lizard lamps or a low watt ceramic heater would work fine too.

Build Pictures:

TC-9102D-HV Build

TC-9102D-HV Build

TC-9102D-HV Build

TC-9102D-HV Build

TC-9102D-HV Build

TC-9102D-HV Build

TC-9102D-HV Build

Fermentation Chamber Heat Source

Fermentation Chamber Heat Source

Fermentation Chamber Heat Source

Fermentation Chamber Heat Source

Fermentation Chamber Heat Source


Other options:

  • Build an extended chamber around a mini-fridge. This has its advantages in terms of capacity and ease of loading.  The door can be setup very close to floor level, so there is no heavy lifting in and out like with my chest freezer. I wound up building a pulley system to save my back.
    • Building a fermentation chamber with a mini-fridge as the cooling source does take some skill. Parts include foam panels, 2×4’s, hinges, caulk, and all the little details to fit it all together.
    • The mini fridge is definitely cheaper than the freezer chest, but if you add in the cost of the materials, and the time it takes to build, it is about the same.
  • Build a pool of water and use aquarium heaters. Good for ales in the winter, but may not work for lagers very well.
  • Heating pads, heating wraps. Again these are okay for ales in the winter when the ambient temperature is below 50, but if you want to lager you need a dual stage controller with ability to heat and cool.
  • Canonical fermentors with built in heating / cooling.These are awesome but very spendy.

Make sure to size your fermentation chamber according to how much beer you want to be fermenting at once. My brew rig can do 11 gallon batches. My fermentation chamber can accommodate two 6 gallon fermentors. This is great for doing a split batch with different yeast! Also great if I want to fill up two corny kegs in a matter of a week or two!

TC-9102D-HV Temperature Controller Beer

Dialing in a specific temperature and pitching yeast at professional rates will take your home brewed beer to the next level. The recipe editor’s yeast section has fields for fermentation temp and yeast pitch rate, both key components to taking your beer to the next level!

Beer Recipe Software Yeast Pitch Rate and Fermentation Temp


I love my Keezer

Saturday, April 3rd, 2010

Home brewers who keg their beer have a keezer or kegerator to keep it cold.

Kegerator = keg + refrigerator
Keezer = kegerator + freezer
Keezer = the place where my beer is kept cold and on tap

I prefer the Keezers, not to be confused with Geezers…
kegerator keezer home brew

A kegerator or keezer can also double as a way to lager. I have used a standard fridge (kegerator) in the past. In the image above, the bucket on the right is a German lager bubbling away. In my opinion, the chest freezer setup (keezer) is much much better than a top/bottom fridge (kegerator). The keezer was cheaper to get setup, it holds more, and it is quieter. I think it also draws less power than a fridge.

Most setups will require a temperature controller. Freezers are designed to go below 32F, so to avoid freezing the beer, the temperature controller cuts power to the compressor when the desired temperature is hit. I keep mine around 40F, but raise it to 50F when doing my primary fermentation for lagers. You can just barely see in the bottom left corner where the senor probe is duct taped to the inside of the freezer.

The unit I went with is the Frigidaire 7.2 Cubic Ft. Chest Freezer from Lowe’s, Model #FFC0723GB. I paid $228 with free delivery! The top/bottom fridge I bought was $499.

Home Brew Talk has an awesome thread about the options here:
https://www.homebrewtalk.com/f35/sizing-your-chest-freezer-corny-kegs-75449/

You can choose between getting one that holds anywhere from 2-10 corny kegs!

The only down side I have found is it is a little harder to lift full buckets, carboys, and corny kegs into the unit.

The inside of chest freezers have a ‘hump’ where the motor is. Corny kegs are too tall to sit on top the hump because the lid would not close. The way around this is to build a collar extension that raises the height of the lid. Most people put their taps through the collar.

In the image above there is a rag to catch drips from the picnic tap. I have read that keezers can get gross inside if not taken care of. Once I spilled a bit of beer on some bottles and did not take care of it. A few weeks later mold started growing. It wasn’t too bad, but I’m glad I caught it early. To avoid any future mess I make sure any beer that goes astray is wiped up immediately. Sometimes the walls of the keezer have moisture on them so I wipe them off occasionally.


Yeasts the difference between ale and lager

Sunday, May 3rd, 2009

Beer snobs will insist that there are truly only two types of beer: ales & lagers. While it’s amusing to hear them explain why a German Dopplebock is a lager while a Wietzenbock is an ale, the truth is that they’re not actually talking about flavors or styles, but yeasts.

Yeasts are living organisms. The distinction between ale yeasts and lager yeasts is based on the temperature range at which they are most active, and where in the wort-suspension the yeast concentrates. Ale yeasts are top-fermenting. During the most active stages of fermentation, usually within the first 5 days of pitching (or adding) the yeast to the wort, ale yeast is visible on the surface of the beer, amidst the foam and bubbles. Lager yeast is active at the bottom of the beer, and is easily missed after the first week as it mixes in with the sediment.

The top- versus bottom-fermentation is an aesthetic difference though; the real distinction is the temperature at which the beer should ferment. Ale yeasts ferment best between 60 -75 degrees F; (12-24C) going below this range slows fermentation, causing the yeast to be “sluggish”, while going above the range increases the risk of bacterial growth and other contamination, as well as causing off-flavors from the yeast. A friend’s batch of hefeweizen suffered because the home thermostat was set to cycle to lower temperatures at night.

Lager yeasts are a slightly different animal. While they ferment best between 35 & 55 degrees F (2-13C), for the first day, the temperature should be in the ‘ale’ range. This is because of the life cycle of yeast: for the first 12-24 hours, the yeast is converting starches in preparation of reproduction and releasing CO2. After this initial “blow off” is done, the beer should be placed in a temperature controlled environment (like a refrigerator) and gradually chilled down to lagering temperatures. Note ‘gradually’; when cooling the wort, the goal is to chill quickly to limit exposure to wild yeasts and bacteria. When chilling the beer to lager it, no dramatic steps are necessary, as the beer should already be in a carboy with an airlock. Sudden, rapid changes in temperature can ‘shock’, or even kill, yeast. Smaller batches are inherently more susceptible to temperature shock due to the smaller volume of liquid.

Some people prefer to make a lager yeast starter at room temperature, then pitch into cooled wort from the kettle, then move the fermenter into the fridge. Lager yeast may also need a dialectal rest, which involves raising the temperature into the 60-65F range for a couple days to let the yeast clean it self up. Diacetyl is a butterscotch like flavor and can be seen as a defect in certain types of lagers, especially light lagers.


Munich Helles Lager – Spaten Clone (Extract)

Thursday, January 15th, 2009

Makes an excellent light lager, but not an American light lager, slightly maltier and more bitter. Very drinkable beer, easy on the palate but not watered down at all. Helles means ‘light’ in German.
This is pretty close to Spaten.

Target Volume (Gallons) 5
Total Cost $33.35
Yield (ounces) 630
Cost per 12 oz bottle $0.64
Boil Time 60 min
GRAINS Pounds Points/Gal Total Points Cost
Extra Light DME (pilsner) 5.5 46 253 $16.50
Steep – 30 min at 150 F
German Pilsner 1 20 20 $1.50
HOPS Ounces Alpha Acids Boil Time (min) Cost
Hallertau 2 3.60% 60 $4.00

YEAST White Labs – German Lager Yeast Cost
Attenuation Low 74% $6.95
Attenuation High 79% 6 pints water, 8oz DME into growler, 70F (room temp) for 24 hours
Optimum Temp 50-55F Primary ferment at 50 for 2-3 weeks, may need 3 day dialectal rest at 65-70F
Flocculation Medium Rack and ‘lager’ at 40 for 4-6 weeks
Starter YES (48hrs @ 70F) 8 oz DME stater $1.50
STATS
Expected Original Gravity 1.055
Expected Final Gravity Theoretical 1.011 – 1.014
Expected Final Gravity Actual 1.011 – 1.013
IBUs 18.44
Apparent Attenuation 80.39% AA = 1 – FG / OG
Alcohol By Volume – Theoretical 5.85%
Alcohol By Volume – Actual 5.38%
BREWING:
½ tbs Irish Moss last 15 minutes of boil $0.10
5 tsp Gypsum, about 0.6 oz $0.75
Added half of the DME in the last 10 minutes to boost hops utilization.
Water Source Wort Tap water
Water Source Dilution Tap water
DATES Date SG Cum. Days Notes
Brewed 10/29/08 1.051 0
Racked 11/17/08 1.012 19 Dialectal rest started 11/12 @55F, 11/13 @60F, 11/14 @65F, 11/15 – room temp (68F), 11/16 – room temp (68F), 11/17 – racked
Bottled (SG pre bottling) 12/11/08 1.010 43

DRINK BY (60 days): 12/28/08
BOTTLING
Priming Method Force Carbonated $0.30
Caps, cleaners, etc
$1.75
Container Capacity Qty Total Volume
Corny Keg 640
Total Bottled: 640
TASTING
12/15/08 Clear flavor, a little bready tasting (yeast may not have settled out completely yet)
01/12/08 Slightly citrus aroma, Bready taste has dropped off completely, now we have a clear crisp slightly malty flavor.
High amount of drinkability, meaning I want another sip right away.


Lagering At Home Video

Monday, November 3rd, 2008

This video shows you what an in home lagering setup looks like. Also includes a look at corny kegs and the temperature controller needed for fermentation of a lager.

The beer being fermented is a Munich Helles!


Want no ads? Go Premium and unlock all our brewing tools!