

Controlling Fermentation Temperature with a Fermentation Chamber
Tuesday, October 8th, 2013Controlling fermentation temperature is a key factor in making repeatable high quality beer. You’ll be amazed at how much your beer will improve by focusing on consistent fermentation temperature, and a related component the yeast pitching rate.
Yeast give off different flavor profiles depending on the temperature the fermentation takes place at. Consider US-05, a widely used dry yeast that is considered neutral in flavor. When fermented cool (around 62F), it leaves almost no flavor signature. When fermented high (above 68F) it can impart a peachy profile. Similarly many English ale strains will be somewhat neutral at the cooler end, but give off strong ester and fruit notes at the higher end. Belgian strains call for a higher temperature, because in those styles the fruitiness is desirable.
So, how can a home brewer guarantee temperature control during fermentation?
The answer is a fermentation chamber, which is made up of the following:
- An insulated chamber.
- A two stage temperature controller.
- A cooling source – typically a freezer chest or mini fridge (which can double as #1).
- A heat source – a lightbulb in a can works great.


Most temperature controllers come un-wired. If you know a little about electrical wiring, this makes a good DIY project. There are also a few models that come pre-wired, and some home brew stores provide this as a service.
Spending the extra $50 for a 2 stage controller with heating and cooling is well worth it. That way you can do lagers and ales, at whatever temperature you want, year round! It also gives a lot of flexibility. With a lager, the diacetyl rest is just a matter of turning up the set point to 65F for 48 hours. Want to cold crash that ale, no problem turn it down to 33F a few days before bottling. Just make sure to fit an airlock before cold crashing. If a blowoff tube is still set, the drop in pressure inside the fermentor will suck some of the fluid in the catch bucket back into the beer (yuck!).
My controller is a Control Products TC-9102D-HV Dual Stage High Voltage Digital Temperature Controller, product sheet and wiring diagrams can be found here. This model tends to change in price a lot. I got mine for $60 last year. There are cheaper options out there, but this one looked like the best compromise of build quality and price.
A note about the TC-9102D-HV and short cycling: make sure to set the differential on the cooling side to a value of 2. The thermometer tends to wobble between values (eg flip between 67 and 68 several times) before it will stay at the new value. Thank you to Foster82 for helping me out in the forum.
My heat source is an incandescent 40W light bulb in a paint can. The idea comes directly from brewstands.com. Incandescent light bulbs are being phased out, but lizard lamps or a low watt ceramic heater would work fine too.
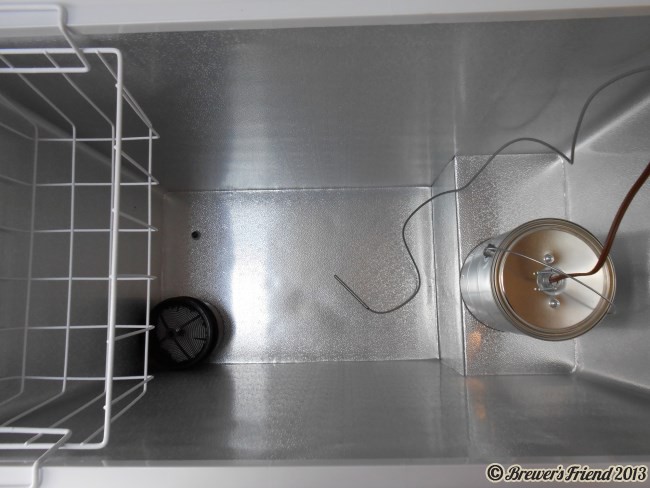
Build Pictures:


Other options:
- Build an extended chamber around a mini-fridge. This has its advantages in terms of capacity and ease of loading. The door can be setup very close to floor level, so there is no heavy lifting in and out like with my chest freezer. I wound up building a pulley system to save my back.
- Building a fermentation chamber with a mini-fridge as the cooling source does take some skill. Parts include foam panels, 2×4’s, hinges, caulk, and all the little details to fit it all together.
- The mini fridge is definitely cheaper than the freezer chest, but if you add in the cost of the materials, and the time it takes to build, it is about the same.
- Build a pool of water and use aquarium heaters. Good for ales in the winter, but may not work for lagers very well.
- Heating pads, heating wraps. Again these are okay for ales in the winter when the ambient temperature is below 50, but if you want to lager you need a dual stage controller with ability to heat and cool.
- Canonical fermentors with built in heating / cooling.These are awesome but very spendy.
Make sure to size your fermentation chamber according to how much beer you want to be fermenting at once. My brew rig can do 11 gallon batches. My fermentation chamber can accommodate two 6 gallon fermentors. This is great for doing a split batch with different yeast! Also great if I want to fill up two corny kegs in a matter of a week or two!

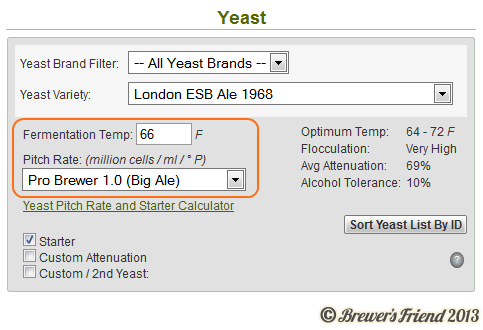
Dialing in a specific temperature and pitching yeast at professional rates will take your home brewed beer to the next level. The recipe editor’s yeast section has fields for fermentation temp and yeast pitch rate, both key components to taking your beer to the next level!


4 Responses to “Controlling Fermentation Temperature with a Fermentation Chamber”
This was an interesting article but you make no mention of the temp probe placement and some of the debate.
Many (most?) argue that the temp probe should be as close to measuring the temperature of the wort/beer as possible up to being inside of it (or in a thermowell).
However, I saw an interesting discussion where someone argued that you want the probe to best replicate how the fridge measures temp. That is, the air temperature. This is because if the air is at a set temp, everything surrounding will equalize to it (with the caveat that you may want to underset by a few degrees until after the vigorous fermentation). The argument is that if you measure inside, there is too much thermal inertia. The fridge (or worse, freezer) will run until it’s much colder and then by the time the wort reaches that temp, the fridge is too cold and will keep cooling it. That will cause the heat to go on. With a simple on/off system that has no variable control, this could be really bad as it may cause cycling.
I am not advocating either method as I have only built my STC-1000 unit but I haven’t put it to use. Still, I would love to see some type of discussion
By Justin Winokur on Oct 9, 2013
I tape my probe to the side of the fermentor. I didn’t want to hassle with a thermowell.
Correct, the fermenting beer may be slightly warmer inside the vessel than out. Maybe 2-5F depending on the yeast strain. I ferment my ales towards the bottom of the temp range usually, which means in theory inside the fermentor the temp may be slightly warmer.
By Larry on Oct 27, 2013
Thanks for the post and especially the photos. Been reading quite a bit on doing this as I contemplate lagers. However, I’m not sure I see from the picture (chamber4.jpg), how you can fit 2 6 gal bucket fermentors in there–what’s the freezer model and/or dimensions?
By Joseph on Oct 28, 2013
It is the Igloo – 7.2 Cu. Ft. Chest Freezer – Seashell White SKU: 5041647
The best buy website appears to be showing the wrong image so I won’t link to it.
It can handle a 6 gallon bucket, and a 6 gallon better bottle without a problem!
By Larry on Nov 7, 2013