

Adding Sight Gauges on A Budget
Sunday, April 26th, 2009$3.26 Sight Gauge modification for hot liquor tank (HLT) or mash lauter tun (MLT).
This article explains how I added a sight gauge to a 10 gallon hot liquor tank (HLT) cooler as well as an identical 10 gallon mash lauter tun (MLT). Gas fired vessels may also be converted in this manner, but use caution! Many polycarbonate tubes are rated up to only 200F, so their use on boil kettles can become a concern if the heat from the gas burner moving up the side of the kettle exceeds this value to any large degree. The temperature of the liquid may be 200F-205F, but the heat licking at the side of the kettle may be much hotter. This parts list for this modification are suited for the mash lauter tun or hot liquor tank – NOT THE BOIL KETTLE!! When adding a sight gauge to a boil kettle, the tubing needs to be rated for higher temperatures, and different gaskets and fittings are needed to withstand the higher temperature and pressure.
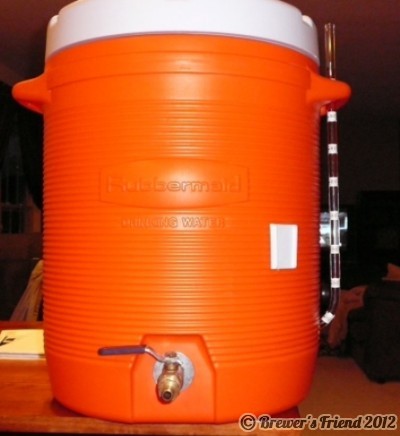
This article demonstrates heating and bending the plastic tubing. I took care to follow safety precautions such as wearing thick gloves, eye protection, not drinking alcohol while doing this mod, staying away from flammable materials, and I kept a fire extinguisher on hand. Now that we are past the safety warnings we can get on with the mod, which comes out looking like this:
Parts List:
Qty: (1) ½” OD x ¼” ID polycarbonate tube approx. 19” in length (McMaster Carr $1.65/foot)
Qty: (1) #5.5 drilled gum rubber stopper (LHBS $.65 each)
Tools Required:
Hack saw/cutoff saw/Dremel tool
Propane Torch/Deep Fryer
1” hole saw/1” step drill
Label Maker
Drill
Step 1. Properly locate the hole where the stopper and sight gauge will enter the side of the vessel. This does not need to be at the very bottom of the vessel, but rather at a location where the minimum fluid level required in the vessel can still be measured. For me this is near the 1 gallon mark. I drilled a 1” diameter hole on center at this location. Fig 1

Fig 1
Step 2. Determine the length of the tubing which to cut. I was sure that the tube reached nearly to the top of the vessel, and that there was ample length after the “L” bend at the bottom to get the tube into the vessel and into the stopper. (The sidewalls on some coolers can be as thick as 2”-3”) Cut the tubing using a fine tooth hack saw or some sort of cutoff saw. A rotary tool such as a Dremel would work as well.
Step 3. Determine where to bend the tubing, this will be 2”- 4” from the end of the tubing depending on your application. I marked this location with a permanent marker. Fig 2

Fig 2
Step 4. The polycarbonate tubing will need to be heated at the end that you intend to make the 90 degree bend. This is where the propane torch, OR deep fryer will work. Using a torch will take more skill than using the deep fryer method, and requires heating the tubing gently and evenly.With the deep fryer, I set the temperature to 350F. When the oil was heated I inserted the end of the tubing intended to be bent, submerging it just past the point where I wanted to make the bend. In either case, 350F polycarbonate retains its integrity, but is very pliable and HOT! I used an oven mitten to protect my hands. After the tubing was made pliable I needed to move fairly quickly make the bend, I used the edge of a cutting board with a ½” radius corner as my guide. This allowed a uniform bend and assured a 90 degree angle. Fig 3, Fig 4

Fig 3

Fig 4
Step 5. Then I let the tubing cool!
Step 6. ASSEMBLE: Inserted the stopper from the inside, into the hole that I drilled in Step 1, then inserted the bottom of the “L” tubing into the stopper in the wall of the vessel. I though of using an eye bolt to support the top of the gauge, but then I realized I can simply use the existing cooler handle.
Step 7. CALIBRATE: I filled the vessel one gallon at a time, marking the level of fluid in the sight gauge as I went. Using a label maker I marked these locations accordingly so that I can now precisely measure strike water, infusion water and sparge water quantities quickly and easily. Fig 5

Fig 5


8 Responses to “Adding Sight Gauges on A Budget”
You can get similar results on bending with a heat gun.
By Larry Richardson on May 2, 2009
Polycarbonate tubing from US Plastics is $0.51 per foot and they sell it by the foot. Shipping is cheap also.
http://www.usplastic.com/catalog/variant.asp?catalog_name=USPlastic&category_name=68&product_id=24993&variant_id=43101
By Jerry Pritchett on Jun 12, 2009
PLEASE NOTE: The link above in “comments” links to 3/8″ OD tubing, this will not work with this build. You must use 1/2″ OD tubing in order to obtain a good seal while following this procedure for building sight gauges. Please be aware that the article calls for 1/2″ OD tubing.
By Rob on Jul 24, 2009
Hey, I just wanted to give you a prop for putting together such a killer website! All those calculators that you have are hugely helpful. I’m getting ready to do my first all-grain batch here in a week or two and I think your site will be a definite go-to for me. Keep up the great work and thanks again for your contribution!!
By Brad on Sep 3, 2009
Would a 1/2″ racking cane work with this build? They come with the bend already there.
By Tom on Nov 21, 2009
Without knowing the max temp. rating of your racking cane, I cannot answer this question. It will depend on the composition and max temp. rating of the racking cane itself.
If the specifications meet the max. temperature that your sigh gauge will experience, then it would certainly work.
By Rob on Nov 22, 2009