Saturday, June 20th, 2009
BIAB is an acronym for Brew In A Bag. It is a dead simple all grain brewing technique. All it requires is a large grain straining bag, 15 gallon kettle and a propane burner. This method is excellent for brewers who are wishing to convert from extract brewing to all grain, because you can make that leap for a very minimal cost. It will also save an all grain brewer 1.5-2.5 hours on a typical brew day. If you combine this method with the No Chill brewing method also listed on this site, you can go from extract to all grain brewing for as little as $25!
BIAB utilizes THREE pieces of equipment:
The kettle: This kettle is the ONLY vessel required to BIAB. The only special requirement is that the kettle have a volume of at least 15 gallons for a 5 gallon brew session. This is because this one vessel will have to hold your entire water requirement as well as your grain bill. This volume will regularly exceed 10 gallons. You will mash and boil in this vessel.
The bag: This is a mesh bag that is large enough to conform to the inside diameter of the kettle and reach over the top lip. This bag is sometimes likened to a large pillow case, the kettle should be able to fit INSIDE it while still being able to close the top of the bag. Typically composed of “voil” or another mesh like material, this will hold your grain bill and must be strong enough to hold the water saturated grain when you lift it out of the mash water at the end of the mash.
The heat source: This is typically the very popular “turkey fryer” burner that is used widely by home brewers. This will be utilized to provide heat for strike water, maintaining mash temperature, mash-out and the boil.
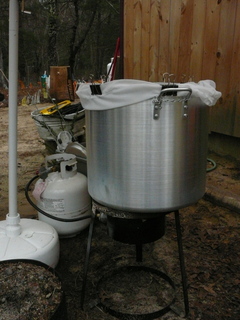
Fig 1.
The process:
Crush your grain finer than you would with a typical all grain brew. This is because you no longer have to worry about a stuck sparge. The bag is the filter and the finer crush will improve your conversion efficiency.
Fill the kettle with the TOTAL water required to complete the entire brew session. Take into consideration that the water absorbed by the grain with this method is about HALF that of a typical all grain brew session that utilizes a MLT. Remember, when you remove the grain bag after the boil, the wort that is left is exactly what you are boiling, so calculate this carefully. Insert and secure the bag at this time.

Fig 2.
After heating the water in the kettle to your calculated strike temperature, pour your entire grain bill into the secured bag. Use a mash paddle to thoroughly mix the grain with the water so that there are no dough balls. There will be a very large volume in the kettle, so temperature control should be as easy as intermediate stirring and a couple quick firings of the burner if the temperature drops.

Fig 3.
After the mash is complete you heat the mash to mash-out temperature, which is crucial to achieving good efficiency with BIAB since you are NOT rinsing the grains.
After mash-out, remove the grain bag and allow it to drain into the kettle. Some brewers will place a rope and a hook above the kettle to suspend the grain bag as it can become heavy with larger grain bills.

Fig 4.

Fig 5.
Finally, boil the wort just as you normally would.

Fig 6.
Additional References:
https://www.homebrewtalk.com/f36/more-brew-bag-biab-success-88486/
https://www.aussiehomebrewer.com/forum/index.php?showtopic=11694
Here are a few important points to make about BIAB:
**DO have a large enough kettle to accommodate about 9 gallons of water AND your grain bill.
**DO have a bag large enough that you can fit the kettle INSIDE it and still close the top.
**DO crush your grain fine, it will produce better conversion efficiency and there is no danger of a stuck sparge.
**DO NOT skimp on mash time, this is more crucial with BIAB, mash for 60-70 minutes to achieve full conversion.
**DO NOT allow your grain bag to come into contact with the bottom of the kettle when you are applying heat, it may melt! Some place a wire cake cooling rack in the kettle to lift the bag off the bottom.
Photos courtesy of user “Daddymen” on homebrewtalk.com. Thank you!
Posted in Brewing, Equipment | 31 Comments »


