


Malt Conditioning
Saturday, January 16th, 2010I find that the longer I brew, the more involved I become in the process and the mechanics of every detail. Learning new techniques and testing them on your own is part of the joy of having a hobby as vast as home brewing. Some new processes or techniques offer little advantage, and thus are disregarded. However, some techniques require so little effort and provide such a noticeable difference that they become standard. For me, malt conditioning is one such technique.
Malt conditioning is a very simple process which consists of adding a very small amount of water to your grain bill prior to milling. The addition of water to your un-crushed malt results in more resilient grain husks. The husks take on a more “leathery” feeling. They are less dry and brittle, which means that they will remain much more intact during the milling process.
Why would a brewer care to leave their grain husks more intact during the milling process? There are several reasons that would lead one to consider malt conditioning:
- Pulverized husks can lead to tanning astringency in beer
- Intact husks will create a more free flowing grain bed (fewer stuck sparges)
- You can crush finer to increase conversion efficiency without shredding husks
Items you will need:
- Atomizer bottle (for misting the malt)
- Scale, preferably digital (to accurately measure the water you are about to add)
- Large spoon or paddle (to thoroughly mix the malt)
- Malt
- Grain mill
The amount of water that you are about to add to your malt is VERY important. If you do not add enough water, the husks will not absorb enough and will remain brittle. If you add too much water, you will potentially moisten the kernel, thus affecting your crush and perhaps causing gumming of your mill rollers. No worries, this technique is EASY.
You will want to add 2% of the weight of the malt bill, in water, to the grain. For example, if you have a 10 pound grain bill, which is 160 ounces, multiply this by .02 (2%) and your result will be 3.2 ounces. This is the WEIGHT of water that you will want to add to your grain bill for conditioning. By doing so, you will thoroughly wet the grain husks, but you will not create a sticky mess in your rollers.
Malt conditioning is easy. A few simple steps and you will be on your way:
1) Weigh the atomizer bottle of water
2) Mist the surface of the grain, and stir
3) Weigh the atomizer bottle again
4) Mist the surface of the grain and stir
5) Repeat until you have added the calculated weight of water to your grain
6) When complete, allow 10 minutes for the husks to absorb this water
As you add water to the grain, it will become more difficult to stir. You may find it easier to add the water to half the malt, or a third of the malt, at a time. When milling, there is no need to change your mill setting, unless you are also wishing to do so. This process will NOT affect the crush of the grain itself, only the condition of the husk material after milling.
If by chance you notice grain sticking to your rollers after milling, you can simply run a handful of dry malt through the rollers to clean them. Also, this could be a sign that too much water may have been added to the malt. You can adjust the water proportions accordingly for your process. Feel free to experiment with 2%, 1.5%, etc,. I have had excellent results, though, using the 2% rule.
Please note that just because this process will allow you to mill your grain finer without shredding the husks, it is not advisable to crush too fine. There will come a point where you will produce too much flour and no amount of husk material will protect you from a stuck sparge.
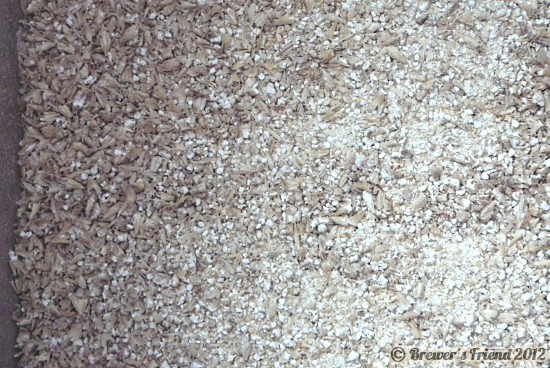
Below are a series of malt conditioning comparison photos, the results are astounding! The setting on my Barley Crusher for the test was .035”.
NON conditioned malt on the left, conditioned malt on the right.

Closeup of conditioned malt:

Closeup of NON conditioned malt:
I have to give credit to Kaiser over at www.HomebrewTalk.com, who also has his own website www.BrauKaiser.com. His website and informative posts within the online brewing forums have been instrumental in educating me on this process.


2 Trackback(s)