Home Brew Blog - Brewer's Friend - Part 30
Brew your best beer EVER. Start your Free Trial of Brewer's Friend today! Sign Up ×

Bulkhead for Cooler style Mash / Lauter Tun

Monday, January 12th, 2009

If you are converting a cooler into a mash / lauter tun this guide will show you how to install a bulkhead and ball valve. On the outside of the cooler, a ball valve attaches to a bulkhead. The bulkhead passes through the wall of the cooler. On the inside it connects to the manifold or braid so the wort will drain in a uniform fashion, with the flow controlled by the ball valve. Nuts and washers on either side of the bulkhead pipe (called a pipe nipple), compress against the walls of the cooler and form a water tight seal. Be warned, this is a fair bit of work to get done and may require several trips to the hardware store.

The bulkhead looks awesome when it is installed. It is something you can be proud of. The first time you open the ball valve to drain wort it is exhilarating, like that first ever sip of home brew. Your friends will be amazed by your dedication to the art.

The finished product:
mash tun ball valve

mash tun bulkhead inside

The first step is drilling the hole in the cooler. For a 1/2” nipple make a 3/4” hole.

mash tun bulkhead inside

In this design I am not using nuts to tighten down the washers. By choosing a very short nipple, the ball valve and the copper converter act like nuts compressing the washers against the walls of the cooler. I added some silicone sealant underneath the washers and inside the opening before assembling, then wiped away the excess after tightening.

mash tun bulkhead inside

Test assembled:
mash tun bulkhead inside

You will need to improvise based on what is available at the hardware store. The hardware guys will look at you like you are nuts when you try to explain what you are doing. A quick note about metals, I would not use anything but stainless steel, copper, or brass for the bulkhead. Palmer’s book How To Brew, has a lot of great information about using metals in the brewery.

On the end of the ball valve, you can convert to vinyl tubing easily with a barbed hose fitting.

Tools:
Drill
3/4” hole saw, spade bit or forstner bit
Medium size crescent wrench
Channel locks

Materials outline:

Ball valve – accommodating 1/2” pipe, stainless steel or brass
1/2” brass or stainless steel pipe nipple, short as possible for your cooler – usually 1”
2 stainless steel washers
Rubber washer for outside
Pipe thread to copper converter
Silicone sealant

One place you can get the parts online is https://www.mcmaster.com/. They are expensive, but this site has everything under the sun, including stainless steel parts.

There is one alternative to the bulkhead approach if you are using a cooler. Some people siphon wort through an outlet in their manifold. I find siphoning to be a clumsy approach. The wort is HOT (around 165 F) so you don’t want to be handling it. I have also seen plastic valves instead of the copper ball valve which attach to a hose.

This site has a related article on how to build a copper manifold for this cooler.

You are welcome to ask questions by commenting below.

Choosing a Kettle for All Grain Brewing

Saturday, January 10th, 2009

If you are going all-grain, you are likely a pretty serious brewer. Eventually you will want to do 10 gallon batches. Even if you are not ready for 10 gallon batches, when going all-grain, it is recommended to jump straight to the 15 gallon size kettle. With a 10 gallon kettle you are limited to 5-7 gallon batches. The 15 gallon kettle is only about 20% more in price over the 10 gallon. It is worth the extra expense now. Otherwise you will have to buy yet another kettle when you are ready for 10 gallon batches.

15 gallon kettle for beer

This 15 gallon kettle covers both the front and rear burners on my gas stove!

A 15 gallon kettle is needed for 10 gallon batches for a couple reasons. Keep in mind with all grain brewing, it is a full wort boil. The original amount of wort collected is above the final amount that goes into the fermenter because of losses due to evaporation during the boil. You also need to leave room in the kettle for the bubbling action of the boil.

Make sure the kettle has an out let for a ball valve:

stainless steel ball valve

This kettle also features a second outlet. A sight gauge or thermometer can be added later on. This one also came with a lid which I use when warming up water or after flame out to keep germs out while the wort chiller is going. These ones came pre welded. You can also buy bulkhead kits to add your own outlets, but be warned many trips to the hardware store may be in order!

Brew kettles are often advertised in quarts. At 4 quarts to a gallon, a 15 gallon brew pot is 60 quarts. This is a side by side comparison of my original 20 quart kettle which I started off with (on the left). The 15 gallon version is on the right. The old kettle is great for heating sparge water.

20 and 60 quart kettles

Beer Styles – Alcohol By Volume Bar Graph

Sunday, January 4th, 2009

NOTE: This chart has been updated with the latest BJCP style guidelines; please see the new chart here: Beer Styles – ABV Chart (Alcohol By Volume Ranges) – 2017 Update

Beer comes in a wide range of alcohol content. This chart shows the BJCP beer styles and their alcohol by volume (ABV) in bar graph format.

beer style abv chart

Data for this chart comes from the the Beer Judge Certification Program (BJCP).

Perhaps it’s time you call an alcohol helpline If you think you’ve been having too many alcoholic drinks lately, and you’re finding it hard to stop.

Glass vs. Plastic for Fermentation

Sunday, December 28th, 2008

There is a lot of debate out there regarding glass versus plastic for the fermentation vessel. It is really a toss up and comes down to personal preference.

Which is better, a glass carboy or a plastic bucket as a fermenter?

In terms of cleaning, buckets are way easier. However plastic buckets seem to hold the smell of the previous batch. Plastic can get small scratches in the surface from abrasive cleaning which can harbor germs. Plastic can also discolor over time.

Plastic Bucket

Carboys are more work to get clean on the inside compared to buckets. Glass stands up to more use because zero smells seep into its surface and it will last forever. Glass carboys are clear, allowing you to see what is going on inside.

5 gallon glass carboy

I avoid using plastic as a secondary fermenter because you want to avoid head space in the secondary. See this article for more about choosing the correct size secondary.

Stainless steel, the third option:

Commercial breweries use neither glass, nor plastic, and opt for giant stainless steel fermenters. For the home brewer, canonical stainless steel fermenters are super expensive, I hope get one someday. In the mean time, there is a simple and affordable third option for fermenting. Use a corny keg. Attach a blow off tube to one of the outlets and close the other by screwing on the quick disconnect. Pour the beer into the corny keg and seal the lid. Now you have a fermenter with a small foot print, ideal for lagering.

English Pub Bitter II, ESB – 2008

Sunday, December 21st, 2008

This was the second attempt at an English Pub Bitter, and it is actually more like an Extra Special Bitter (ESB) this time given the IBUs at 43+. I am very happy with the results, the beer is definitely bitter, but not flooring. It has a nice malty flavor, a pretty deep golden hue, and a crisp finish. Head retention has been good.

Target Volume (Gallons) 5      
Total Cost $39.39
   
Yield (ounces) 595      
Cost per 12 oz bottle $0.79      
Boil Time 60 min    
       
GRAINS Pounds Points/Gal Total Points Cost
Light DME 5.5 46 253 $18.00
     
Steep – 30 min at 150 F      
British Malt 1 28 28 $1.49
       
HOPS Ounces Alpha Acids Boil Time (min) Cost
Magnum 1 14.00% 60 $2.00
Cascade 1 6.00% 60 $2.00
Yamhill Goldings 1 4.00% 20 $5.95
Yamhill Goldings 1 4.00% 10

       
YEAST White Labs British Ale Cost
Attenuation Low 63%     $6.95
Attenuation High 70%    
Optimum Temp 65-68F    
Flocculation      
     
Starter No
       
STATS
Expected Original Gravity 1.056    
Expected Final Gravity 1.017 – 1.021    
IBUs 43.89
 
Apparent Attenuation 74.07% AA = 1 – FG / OG  
Alcohol By Volume – Theoretical 5.54%    
Alcohol By Volume – Potential 5.25%
       
       
BREWING: Brewed out doors, that was fun
½ tbs Irish Moss at start of boil     $0.10
Burton Salts – 5 tsp, package says 1 tsp per gallon     $0.75
Water Source Wort Tap water, 3.5 gallons    
Water Source Dilution Tap water
       
DATES Date SG Cum. Days Notes
Brewed 09/14/08 1.054 0
Racked 09/20/08 1.018 6
Bottled (SG pre bottling) 09/28/08 1.014 14
 
 
OK TO DRINK BY (60 days): 11/13/08
       
BOTTLING
Priming Method 4 oz Corn Syrup     $0.40
Caps, cleaners, etc
    $1.75
     
Container Capacity Qty Total Volume
Lagunitas 22 6 132
Half Liter (Deutsch) 17 7 119
Bottle 12 18 216
Jug 64 2 128
  Total Bottled: 595
       
       
TASTING
   
10/03/08 19 Strong bitterness present, needs to carbonate more.
10/28/08 44 Brings a new meaning to ‘extra special bitter’.
    Not sweet at all, a bit of a malt flavor, mostly the magnum hop bitterness comes through.
    Strong bubbles and head formation.
12/20/08 97 The oxy caps are awesome! English friend I know says it reminded him of the ‘better stuff’ at home.

How to Brew – By John Palmer

Thursday, December 18th, 2008

How to Brew – By John Palmer
Everything You Need To Know To Brew Beer Right The First Time

This is the book to own for home brewing. I found it especially useful after I had done a few extract batches and was looking to go into the all-grain realm. The book goes into a lot of detail and it can move quickly at times. As I continued to brew I began to rely on it more and more. Other books out there were either too detailed, or too basic in terms of all grain brewing. This book is very detailed about all grain brewing and it gives a really nice chapter on ‘how’ to do it. There are several other chapters on the specifics behind all grain brewing as well. The appendices on building out your own chiller, mash tun, and gravity system present interesting challenges to tackle as you move ahead with brewing.

The entire book is also available online at this url: https://www.howtobrew.com.

Topics unique to this book:

  • Best explanation out there on your first all-grain batch

  • Covers details on milling mashing, mash pH, lautering.

  • Formulating recipes

  • Building your own wort chiller

  • Building a mash/lauter Tun

  • Metallurgy and brewing

  • Gravity systems

  • RDWHAHB – Relax, Don’t Worry, Have a Home Brew

Extremes of the BJCP Guidelines 2008

Friday, December 12th, 2008

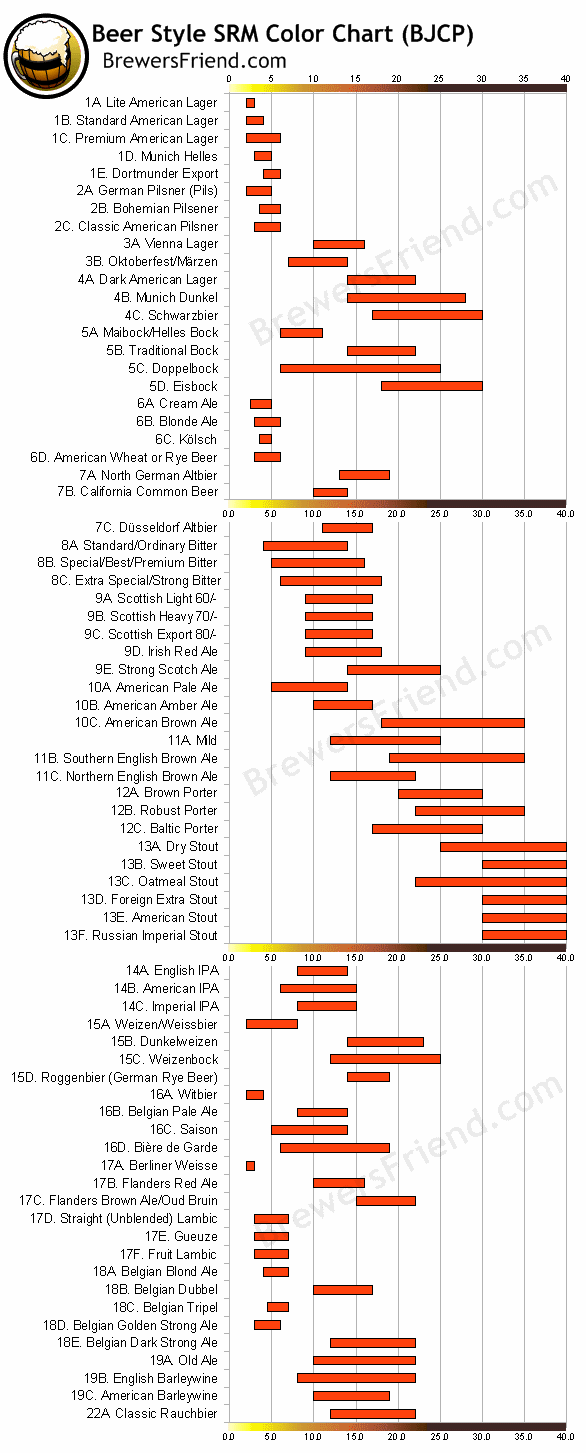
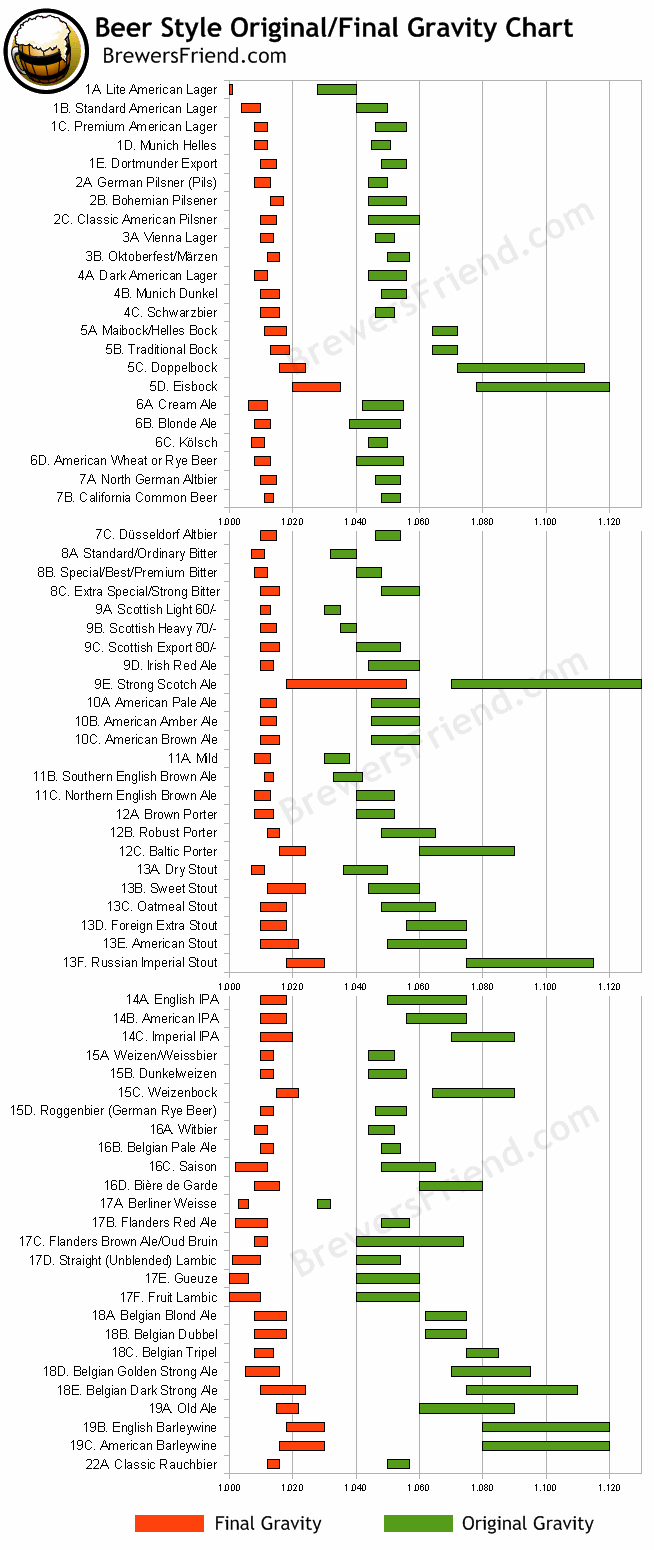
The Beer Judge Certification Program (BJCP) puts out a set of style guidelines for beer, mead, and cider. Across the categories of beer there is a wide variation in average alcohol content, bitterness, and color. This article examines the average for OG, FG, ABV, IBU and SRM for the beer categories and reports the maximum and minimum values found and the accompanying styles.

Alcohol By Volume (ABV) :

Highest, 11.5%:
5. BOCK D. Eisbock

Lowest, 2.85%:
9. SCOTTISH AND IRISH ALE A. Scottish Light 60/-

International Bittering Units (IBUs) – Higher numbers represent a more bitter beer.

Highest, 60 for a tie between:
14. INDIA PALE ALE (IPA) C. Imperial IPA

19. STRONG ALE C. American Barleywine

Lowest at 0 for:
20. SOUR ALE D. Straight (Unblended) Lambic
21. SOUR ALE E. Gueuze
22. SOUR ALE F. Fruit Lambic

Standard Reference Method (SRM) – Measure of color on the Lovibond scale, higher means darker:

Highest, 40 for a tie between all the Stouts:
13. STOUT A. Dry Stout
13. STOUT B. Sweet Stout
13. STOUT C. Oatmeal Stout
13. STOUT D. Foreign Extra Stout
13. STOUT E. American Stout
13. STOUT F. Russian Imperial Stout


Lowest at 2 for the following:
1. LIGHT LAGER A. Lite American Lager
1. LIGHT LAGER B. Standard American Lager
1. LIGHT LAGER C. Premium American Lager
2. PILSNER A. German Pilsner (Pils)
15. GERMAN WHEAT AND RYE BEER A. Weizen/Weissbier
16. BELGIAN AND FRENCH ALE A. Witbier

17. SOUR ALE A. Berliner Weisse

Original Gravity – OG, how much fermentable sugar is present:

Highest, 1.130:
9. SCOTTISH AND IRISH ALE – E. Strong Scotch Ale

Lowest, 1.028:
1. LIGHT LAGER A. Lite American Lager
17. SOUR ALE A. Berliner Weisse

Final Gravity – FG, how much sugar is left behind (how sweet the beer is):

Highest, 1.056:
9. SCOTTISH AND IRISH ALE – E. Strong Scotch Ale

Lowest, 1.001:
1. LIGHT LAGER A. Lite American Lager

Extreme brewers, even a few breweries, have successfully pushed far past theses ‘guidelines’. For example, Dogfish Head’s 120 minute IPA pushing 21% alcohol by volume! It would be difficult to calculate IBU’s for a 5 gallon batch of beer that was brewed with several pounds of hops, but at that point who is counting?

Recording Keeping For Extract Brewers

Sunday, December 7th, 2008

Most beginning brewers start with malt extract. Compared to all grain brewing there is a lot less to track, but it can still be overwhelming at first. Our Brew Day Sheet for Extract Recipes will help you to make sense of this, and brew more consistently.

The most basic thing to track at first is the exact batch ingredients:

  • Pounds and type of malt extract (dry or liquid)
  • Steeping grains (optional but recommend)
  • Hops, variety, alpha acid content, and boil time for each amount
  • Yeast
  • Other, such as gypsum, Irish moss, gelatin, flavoring herbs, etc
  • It is also useful for some people to track the cost of the batch.

The main variables to keep track of for an extract brewer are:

  • OG – Original Gravity, basically how much sugar you started with. This involves taking a hydrometer reading before pitching the yeast.
  • FG – Final Gravity, how much sugar you were left with. To measure this, take a hydrometer reading at the time of bottling before adding priming sugar.
  • IBU – International Bittering Units, how bitter your beer will be.
  • ABV – Alcohol by Volume, uses OG and FG to calculate.

Calculators at this site can be used to generate these numbers.

Check out the Brew Day Sheet for Extract Recipes, it is a free resource.

Money Saving Tips – Repitching Yeast

Wednesday, November 26th, 2008

Update 11/12/2011: Check out the article on Bad Batches to see why you might want to avoid re-pitching yeast, or if you do so, make sure to understand the risks involved.

Did you know you can save ~10% on your next batch of home brew by re-pitching yeast? Some brewers buy new yeast for each batch. That is a good way to guarantee results provided the yeast is within the expiration date and has been refrigerated properly. However, at $7 a hit that comprises about 20% of the cost of the batch! With a little planning in terms of recipes and beer styles you can easily cut this in half or a third. It is a normal thing to do. The commercial breweries reduce their costs by repitching over and over.

Harvesting the yeast cake at the bottom of a finished primary fermentation vessel is easy. After siphoning off the beer into the secondary or bottling bucket the yeast will be left behind. Pour the yeast slurry (also called the yeast cake) into a sanitized container for safe keeping. You may need to loosen it up with some clean water. The yeast can be saved for several weeks in the fridge. It can be siphoned into regular 12oz bottles and capped, or put in a jar with an airlock.

The yeast can also be repitched immediately if you rack or bottle your old batch while you are cooling your new batch.

Do not repitch yeast that came from a contaminated batch, or had a weak or incomplete fermentation. Any yeast that had a healthy fermentation will work for this technique and it can be repeated many times. The maximum I have heard is ten times. That is getting up there and would limit choices of beer styles. Yeast can be a big factor in flavor and body. See a complete list of yeast strains by clicking here.


Expired yeast was a dud

Sunday, November 23rd, 2008

I have only had one bad experience with expired yeast. It was White Labs Southern German Lager. I found out after I got home it was about 6 months out of date!  I made up a normal starter using a half pound of DME and 4 pints of water (half gallon), to get a gravity of ~1.045. I cooled it down and pitched the ‘expired’ yeast into a 1 gallon glass jar. It just sat there for a few days and hardly bubbled through the air lock but a few times. I ended up tossing the whole thing out. This has taught me to always check the expiration date on the yeast.