

Racking Tutorial with a Built In Spigot
Saturday, April 9th, 2011Racking beer is made easy if your primary fermenter has a spigot. Note that this piece of equipment is essentially a bottling bucket with a good lid. They are cheap and easy to use with only a few drawbacks.
Racking beer is not required, but it can add clarity in the final beer. I only rack my ales about a third of the time. If you are going to dry hop, doing a very strong beer, or fermenting for more than 3-4 weeks, then racking is a good idea. There is an exception, I always rack my lagers before cooling them down to 33F for 4-6 weeks.
Here is how I racked my latest batch of Oktoberfest:
1) At least one day before, lift the primary fermenter up to a table. This will give the yeast time to settle back down.
2) Sanitize secondary fermentor, hose, cork and airlock. I like StarSan for this purpose. Have your hydrometer and a sampling cup on hand.
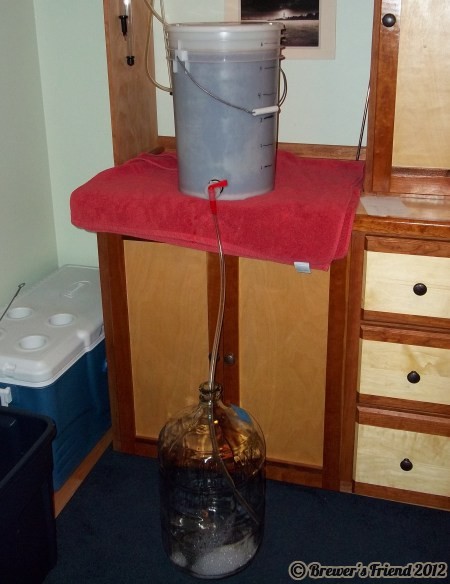
3) Get the hose hooked up and dropped into the secondary. Turn on the hose. Minimize splashing if possible. Depending on how low the spigot is some yeast will come through, but not a lot.

4) About half way through I stop the hose, and take a sample for gravity and taste. I make sure my hands are VERY clean for this step.

5) Continue draining. Tip the bucket at the end. Make sure to fill it to the top.

6) Record your hydrometer value and note the flavors.
Primary fermentation in a bucket is easy for the following reasons:
- Easy to sanitize the bucket. Those 90-degree brushes for cleaning carboys can be a pain to use.
- Easy to clean the bucket after fermentation.
- When fitted with a spigot, draining is a breeze. No siphon is needed. There is less equipment to sanitize and clean up.
- Stopping the flow to take a sample is easy.
Knocks against using a plastic buckets as a fermenters:
- Odors can remain behind in plastic, especially strong dark beers.
- There is concern for oxygen penetration.
- The seal can fail around the spigot. Never had this happen, but it would be a major mess. I fitted mine with a double set of washers on the inside and outside. This did involve a trip to the hardware store, and I bought extra. I keep a habit of only turning the spigot clockwise, so I don’t accidentally loosen the thread.
The real solution to this issue is to buy a stainless steel canonical fermentor. This is how commercial breweries do it. Compared to a carboy or plastic bucket they are fifteen times the price! Figure spending at least $500 on one.
Notice there was no head space in the secondary. That was 100% on purpose to avoid oxidation. Check out information in this article about why topping of the secondary is important.
Update 11/12/2011: Check out the article on Infected Batches to see why you might want to tear down your bottling bucket now and then, since the spigot can get pretty gross without you knowing it.


1 Trackback(s)