


Does that make it go faster?Nice! Don't you need some yellow stripes?

You are using an out of date browser. It may not display this or other websites correctly.
You should upgrade or use an alternative browser.
You should upgrade or use an alternative browser.
Show your DIY Projects
- Thread starter DanC
- Start date
Does that make it go faster?
Just looking at your avatar.
Ah, yes that would be good!Just looking at your avatar.
- Joined
- Mar 24, 2018
- Messages
- 3,154
- Reaction score
- 6,061
- Points
- 113
The last times I did a pale or a blonde, I had a little suck back while cold crashing so we are going to try to capture the CO2 from the next one I brew. A bunch of CPVC fittings I had lying around, a fermentation lock, 2 Mason Jars and some rubber washers later I had this to capture set up. The hardest part was getting an axis on the lid so I could evenly space the holes to put the fittings through...thank you grade school Geometry Class!

Who said we'ed never use that stuff!
Who said we'ed never use that stuff!
This looks impressive, how does it work?The last times I did a pale or a blonde, I had a little suck back while cold crashing so we are going to try to capture the CO2 from the next one I brew. A bunch of CPVC fittings I had lying around, a fermentation lock, 2 Mason Jars and some rubber washers later I had this to capture set up. The hardest part was getting an axis on the lid so I could evenly space the holes to put the fittings through...thank you grade school Geometry Class!
View attachment 14031
Who said we'ed never use that stuff!
- Joined
- Mar 24, 2018
- Messages
- 3,154
- Reaction score
- 6,061
- Points
- 113
This looks impressive, how does it work?
Expansion and contraction. You fill your bulb and the jar on the left with some water after blow of when you have a good steady fermentation off gassing going on. You would move your blowoff tube out if the bucket of water you have it in into the capture contraption. The CO2 going into the jar on the left will force the water into the jar on the right while filling the jar on the left with CO2. Any extra CO2 will off gas like normal out the bulb lock on jar right after all the water has been displaced from jar left.
When the fermentation is done and you go to cold crash, this and your carboy go into the fridge or keezer and as your beer cools down the beer's molecules will become smaller creating a vaccum in the carboy sucking the CO2 out of jar left and not air with oxygen and any other potential contaminates into the carboy. The water in jar right will flow back into jar left. This is supposed to be the cure for cold side oxidation with IPA's with massive hop additions. Some other methods use a mylar balloon...I think somebody else used that method on this forum...
That's pretty snazzyExpansion and contraction. You fill your bulb and the jar on the left with some water after blow of when you have a good steady fermentation off gassing going on. You would move your blowoff tube out if the bucket of water you have it in into the capture contraption. The CO2 going into the jar on the left will force the water into the jar on the right while filling the jar on the left with CO2. Any extra CO2 will off gas like normal out the bulb lock on jar right after all the water has been displaced from jar left.
When the fermentation is done and you go to cold crash, this and your carboy go into the fridge or keezer and as your beer cools down the beer's molecules will become smaller creating a vaccum in the carboy sucking the CO2 out of jar left and not air with oxygen and any other potential contaminates into the carboy. The water in jar right will flow back into jar left. This is supposed to be the cure for cold side oxidation with IPA's with massive hop additions. Some other methods use a mylar balloon...I think somebody else used that method on this forum...

- Joined
- Jul 13, 2012
- Messages
- 1,039
- Reaction score
- 745
- Points
- 113
I think you just blew my mindExpansion and contraction. You fill your bulb and the jar on the left with some water after blow of when you have a good steady fermentation off gassing going on. You would move your blowoff tube out if the bucket of water you have it in into the capture contraption. The CO2 going into the jar on the left will force the water into the jar on the right while filling the jar on the left with CO2. Any extra CO2 will off gas like normal out the bulb lock on jar right after all the water has been displaced from jar left.
When the fermentation is done and you go to cold crash, this and your carboy go into the fridge or keezer and as your beer cools down the beer's molecules will become smaller creating a vaccum in the carboy sucking the CO2 out of jar left and not air with oxygen and any other potential contaminates into the carboy. The water in jar right will flow back into jar left. This is supposed to be the cure for cold side oxidation with IPA's with massive hop additions. Some other methods use a mylar balloon...I think somebody else used that method on this forum...

- Joined
- Mar 24, 2018
- Messages
- 3,154
- Reaction score
- 6,061
- Points
- 113
I think you just blew my mind
LOL...blame it on my freebie refrigerator and now that I don't have to brew light stuff when my cellar is only some 20° cooler than outside anymore!
- Joined
- Mar 12, 2017
- Messages
- 2,833
- Reaction score
- 5,890
- Points
- 113
Love it! That has been on my DIY list ever since I saw it in a homebrew magazine selling for $50!
Brulosophy had it on some to of their exbeerments. Looks cool
- Joined
- Mar 24, 2018
- Messages
- 3,154
- Reaction score
- 6,061
- Points
- 113
Brulosophy had it on some to of their exbeerments. Looks cool
DING! Yeppers, that was most of the motivation!
Dang it this has got some wheels spinning in my brain now...wonder how much pressure those milker buckets in the basement will hold.The last times I did a pale or a blonde, I had a little suck back while cold crashing so we are going to try to capture the CO2 from the next one I brew. A bunch of CPVC fittings I had lying around, a fermentation lock, 2 Mason Jars and some rubber washers later I had this to capture set up. The hardest part was getting an axis on the lid so I could evenly space the holes to put the fittings through...thank you grade school Geometry Class!
View attachment 14031
Who said we'ed never use that stuff!
- Joined
- Mar 14, 2018
- Messages
- 11,602
- Reaction score
- 21,870
- Points
- 113
I have what I need to put something like this together, just need to get motivated ..The last times I did a pale or a blonde, I had a little suck back while cold crashing so we are going to try to capture the CO2 from the next one I brew. A bunch of CPVC fittings I had lying around, a fermentation lock, 2 Mason Jars and some rubber washers later I had this to capture set up. The hardest part was getting an axis on the lid so I could evenly space the holes to put the fittings through...thank you grade school Geometry Class!
View attachment 14031
Who said we'ed never use that stuff!
- Joined
- Feb 4, 2021
- Messages
- 1
- Reaction score
- 7
- Points
- 3
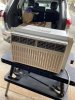
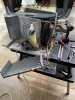
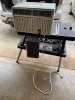
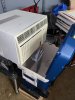
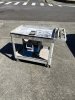
I made a glycol chiller to better maintain temp and to assist with cold crashing. Basically I used an old 5000 btu AC and carefully bent the cold side down below the unit. Removed lid from an Igloo cooler to hold the Glycol/Water mixture. Crated a shroud for the AC exhaust to allow for ducting heat outside. Submerged 2 400 gph pumps and a small aquarium water mixing fan. The entire project cost under $400 including wood and ducting to get the heat out of my space.
I have also attached a picture of the logs from three InkBird 308-TC wifi units tracking Glycol, Beer and Room Temp.
The chiller needed about a 2 hour break during the initial cooling of the wort to get the glycol back down to 20 degrees after it reached about 45-50 degrees. The wort had dropped from 170 degrees down to about 90 degrees by that time. My second batch needed a similar mid chill break.
Calculated operating expense in Hawaii is about $6.50 per batch. A big savings over buying bags of ice at about $7 a day or about $80 a batch.
Attachments
-
 BZB-GlycolChiller - 01.jpg208.7 KB · Views: 181
 -
 BZB-GlycolChiller - 02.jpg237.5 KB · Views: 168
 -
 BZB-GlycolChiller - 03.jpg225 KB · Views: 176
 -
 BZB-GlycolChiller - 04.jpg155.1 KB · Views: 178
 -
 BZB-GlycolChiller - 05.jpg328.1 KB · Views: 187
 -
 BZB-GlycolChiller - 06.jpg260 KB · Views: 176
 -
 BZB-GlycolChiller - 09.jpg59.8 KB · Views: 174
 -
 BZB-GlycolChiller - 10.jpg225.2 KB · Views: 172
 -
 BZB-GlycolChiller - 11.jpg101.3 KB · Views: 180
 -
 BZB-GlycolChiller - 12.png280.6 KB · Views: 163
- Joined
- Mar 14, 2018
- Messages
- 11,602
- Reaction score
- 21,870
- Points
- 113
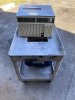
Nothing so elaborate as a home made glycol chiller, but thought I would share this. I keep sanitizer in these jugs and use it over and over again. Also calculated the amount of starsan per jug at 6ml. No need to make up a 5 gallon bucket ever again.

- Joined
- Mar 23, 2018
- Messages
- 1,118
- Reaction score
- 2,185
- Points
- 113
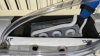
Picked up a Brewzilla 35L last month, and had ordered a sparge arm as well.
My guy couldn't tell me how long it would take to get it in so I cancelled and made this for about $5.00 (Canadian Dollars, so that is like $3.50 US). I will probably redo this in stainless once it proves to work well, but I had the tubing , and the camlock fitting, just needed to get the brass tube fitting. And of course there is Humphrey Brewgart casting his ever suspicious eye on what I am doing.
View attachment 11704
View attachment 11705
"Here's Looking At Brew Kid..."
Very cool!I made a glycol chiller to better maintain temp and to assist with cold crashing. Basically I used an old 5000 btu AC and carefully bent the cold side down below the unit. Removed lid from an Igloo cooler to hold the Glycol/Water mixture. Crated a shroud for the AC exhaust to allow for ducting heat outside. Submerged 2 400 gph pumps and a small aquarium water mixing fan. The entire project cost under $400 including wood and ducting to get the heat out of my space.
I have also attached a picture of the logs from three InkBird 308-TC wifi units tracking Glycol, Beer and Room Temp.
The chiller needed about a 2 hour break during the initial cooling of the wort to get the glycol back down to 20 degrees after it reached about 45-50 degrees. The wort had dropped from 170 degrees down to about 90 degrees by that time. My second batch needed a similar mid chill break.
Calculated operating expense in Hawaii is about $6.50 per batch. A big savings over buying bags of ice at about $7 a day or about $80 a batch.
Thanks for sharing
- Joined
- May 10, 2019
- Messages
- 1,643
- Reaction score
- 3,687
- Points
- 113
So how did the test boil go? My condenser works great and boiling in the basement now is a not a rainy day. If you plan to brew in the basement, it's the only way to go.
