Show your DIY Projects

started using a bag inside the insert, for easy cleaning. had problems getting my filter and plate chiller clogged so I made it possible to forwards and backwards through each then drain to a clean out valve connected to a hose going out to the yard
 

Attachments

  • WP_20150205_003.jpg
    WP_20150205_003.jpg
    166.9 KB · Views: 2,597
  • WP_20150205_001.jpg
    WP_20150205_001.jpg
    122.8 KB · Views: 2,441
OMB
^^^^^^^^^^^^^^^^^^^^^^^

That looks like an old episode from the 3 stooges when they were fixing some plumbing leaks in a bathtub! haha! :lol:
Brian
 
yes a little costly too but I love it , no more wort on the floor and burns hands from taking off hoses, got the whirlpool working perfectly pooling everything to the center, trub/hop filter takes out the rest and the chiller comes out at 60 and best of all it all rolls in the corner in tact..... :D
 
This was my weekend project. Now to resume brewing so I can get those kegs filled!
 

Attachments

  • 10425851_10102521484676409_1893233555334777712_n.jpg
    10425851_10102521484676409_1893233555334777712_n.jpg
    75.9 KB · Views: 2,389
  • 11079615_10102521484546669_9143429647322120381_n.jpg
    11079615_10102521484546669_9143429647322120381_n.jpg
    52.6 KB · Views: 2,326
Great Build My Man, now take out the shelf and add 5 gallon kegs?? he he
 
wolfie7873 said:
This was my weekend project. Now to resume brewing so I can get those kegs filled!


I especially like that fancy restraining device you have on the CO2 bottle.
 
Has anyone seen or heard of converting a gas grill box into a brew stand?

I have old gas grill and wondering if it would be possible. Of course, existing burners would not be usable. Would need to retro fit a banjo burner.
 
it a good idea, been thinking about that for a year. my old stainless grill sitting in the corner of my deck for the last year but gave it away instead, I say make sure its sturdy and try it
 
I guess this is the spot to show my jockey box I made last week to supply 2
family weddings and a retirement party this summer(volunteerd to make all
the beer and wine) 300 bottles of wine and about 20 all grain batches of beer.
it holds 8 kegs and has 5 taps .tried my hand at cider to turned out quite nice
back sweetened with some Belgian candy syrup.the kegs go in but I also added
5 25' cooling coils on the bottom that will sit in the ice water.hope it's nice and cold.there will be IPA CIDER STOUT( with proper tap ) wheat and a Pilsner.
can't wait to start doling it out.
 

Attachments

  • image.jpg
    image.jpg
    104.9 KB · Views: 2,084
  • image.jpg
    image.jpg
    82.4 KB · Views: 2,068
mike7020 said:
I guess this is the spot to show my jockey box I made last week to supply 2
family weddings and a retirement party this summer(volunteerd to make all
the beer and wine) 300 bottles of wine and about 20 all grain batches of beer.
it holds 8 kegs and has 5 taps .tried my hand at cider to turned out quite nice
back sweetened with some Belgian candy syrup.the kegs go in but I also added
5 25' cooling coils on the bottom that will sit in the ice water.hope it's nice and cold.there will be IPA CIDER STOUT( with proper tap ) wheat and a Pilsner.
can't wait to start doling it out.

Nice job. Too bad you had to work in that fog.
 
quite the comedian.got a good laugh out of that comment.Ill post a clear pic
when it's done being hooked up.
 
Fermentation Fridge all set up ....
 

Attachments

  • IMG_1886.JPG
    IMG_1886.JPG
    83.5 KB · Views: 1,490
That's big! Do you really have need for a blowoff tube, or is that just in case? I put one lager in one chamber today. I'll put another lager in my other chamber tomorrow.

Edit: or do you not have the height for a traditional airlock?
 
I've always used a blow off tube, just in case. And I've had a few blow offs.
A three piece airlock won't fit with the primary carboys either. The secondary fits with a regular airlock.
Testing this now to see how cold it will get. Hopefully it will get down to lagering temp. We'll see.
 
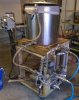
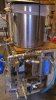
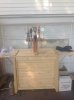
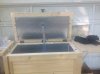
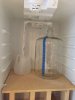
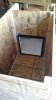
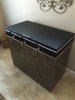
Here's a progress shot of the fermentation chamber that I'm building. "Why don't you just use a chest freezer?" A couple of reasons. The entire cost for this build will be under $100 for which new chest freezers are small, and used freezers are, well, used. If it dies, I have to replace the whole thing. My build is chilled by a mini fridge setup basically like a window unit for a small, well insulated room. If/when the fridge kicks the bucket, I can replace it for another more cheaply than replacing a chest freezer.

The box will hold a giant rubbermaid full of sanitizer. The fermentors will sit in that water bath with an aquarium heater and pump for circulation wired with the fridge to an STC-1000. I still need to insulate and cut the lid to size, but I'm almost there. We got an early heat wave here in NC so brewing has stopped. This will help me brew year-round in any style.
 

Attachments

  • fermentation_chamber_scaled.jpg
    fermentation_chamber_scaled.jpg
    115.7 KB · Views: 1,392
You will find your beer will be next level stuff with precise temperatures. I hope the fridge coil can keep the temps you want.

One Idea, install a side door, so the carboy can be easily removed. Unless, of course, your a young guy and don't mind lifting over the side.
 
"Just a tip" , I have one built and working just like yours but using 2" Styrofoam in the walls and door, the only coils are in the freezer. take the freezer door off, I added a pretty strong cfm 115v fan and wedged it with a gel pack in the freezer, I leave the fan on all of the time when the unit is powered on even if the fridge is powered off, this helps keep a constant temp. I also had to cool the outside compressor coils, they kept getting too hot and transferring the heat into the fridge, that fridge is not designed to run for more than a few minutes at a time so running for 15 to 30 minutes heats it up so I had to used a box fan to keep it cool, now it gets down to 55 by adding these tips, hope it works out for you :D
 
Just finished this keezer...had the wife do some "martha stewart" touch ups...enjoy
 

Attachments

  • image.jpg
    image.jpg
    130.4 KB · Views: 1,391
That is rather artistic for a homebrewer. Nice build. Any ideas on a drip tray?
 
Im looking now. The cheapest I have seen is on ebay @ $25 per. I am needing two which will cover all taps..still got some tweeking to do but overall happy with the outcome...on to the next project...If you know of any other sources for a drip tray that is at least 30" id appreciate the information.

http://www.ebay.com/itm/4-x-19-STAINLES ... 5404a6ce50
 

Back
Top