New Heatstick

GernBlanston

New Member
Trial Member
Joined
Mar 22, 2014
Messages
317
Reaction score
2
Points
0
Got my new heatstick together and functional. 50 amp service drops in this weekend. The control panel is painted and ready to be wired
 

Attachments

  • IMG_7776 (800x533).jpg
    IMG_7776 (800x533).jpg
    64.4 KB · Views: 3,431
  • IMG_7777 (800x533).jpg
    IMG_7777 (800x533).jpg
    55.6 KB · Views: 3,423
nice, drop in and easy to clean ! but why 50 amp though, doing 2 at once I take it, that element only draws 23 amps at full power
 
Ozarks Mountain Brew said:
nice, drop in and easy to clean ! but why 50 amp though, doing 2 at once I take it, that element only draws 23 amps at full power


Room for expansion. I plan to run two elements in the future, and the time to get the wiring done right, is now. Don't want to have to upgrade the service later. The cost difference for the breakers was minimal, and the wire upgrade ( from #8 to #6) was free. For me at least. I know a guy, you see.
 
excellent, I'm almost finished with my new control box, still have more to do on my new brew rig design though, procrastination gets the better of me these days

Ive tested this using 1 pot and it works fine just need to add more goodies and make it pretty :D
 

Attachments

  • WP_20150925_001.jpg
    WP_20150925_001.jpg
    46.5 KB · Views: 3,386
  • WP_20150925_006.jpg
    WP_20150925_006.jpg
    51.9 KB · Views: 3,409
Getting started. The empty shell.
 

Attachments

  • IMG_7819 (533x800).jpg
    IMG_7819 (533x800).jpg
    97.9 KB · Views: 3,349
  • IMG_7820 (800x533).jpg
    IMG_7820 (800x533).jpg
    58.1 KB · Views: 3,342
nice , I like it, I can tell your a open minded person, good job...spooky lol
 
Got most of the wiring done. The power disconnect is of my own design. Cheap and functional. The wires are not as neat as some guys do, but its better than that birds nest that Ozarks has. Plenty of room to expand to add another element and PID in the future.
 

Attachments

  • IMG_7911 (800x533).jpg
    IMG_7911 (800x533).jpg
    93.2 KB · Views: 2,969
  • IMG_7912 (533x800).jpg
    IMG_7912 (533x800).jpg
    94.2 KB · Views: 2,972
  • IMG_7913 (533x800).jpg
    IMG_7913 (533x800).jpg
    75.6 KB · Views: 2,947
Nice, lots of room too, I revised mine a bit but the box is only 12 inches so ill go with"form follows function" he he
 
ok sorta fixed, I reserve the right to be sloppy (while drinking) he he
 

Attachments

  • WP_20151115_002.jpg
    WP_20151115_002.jpg
    77.6 KB · Views: 2,872
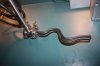
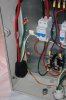
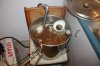
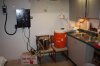
First electric basement brew day.
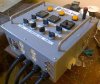
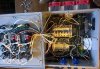
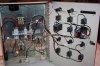
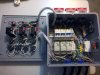
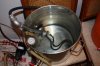
In a simulated trial run I took 6 gal of water from cold (54F from the tap) to boil in 18 min. That was on manual at 100% power. Automatic takes longer as it will slow down as it approaches the target temp. All in all, I shaved an hour and half off my brew day, and as I dial in my new procedure It should come down some more.
Most importantly, NO STAIRS! I have been humping equipment and fermenters up and down stairs for 20 years. This is my first all basement brew. All I do is carry the milled grains down, and the spent grains up. The beer will be brewed, fermented, kegged and consumed on the same level. When I get the bathroom installed, that will eliminate the remaining necessity for stairs.
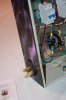
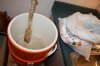
I need to build a proper brew stand, as chairs and cardboard boxes don't cut it. Good enough for now. Also the ventilation system isn't finished, so it got a bit muggy. These things can all be fixed.
 

Attachments

  • IMG_7961 (800x533).jpg
    IMG_7961 (800x533).jpg
    71.8 KB · Views: 2,852
  • IMG_7958 (800x533).jpg
    IMG_7958 (800x533).jpg
    78.5 KB · Views: 2,887
  • IMG_7955 (800x533).jpg
    IMG_7955 (800x533).jpg
    71.9 KB · Views: 2,880
  • IMG_7953 (800x533).jpg
    IMG_7953 (800x533).jpg
    85.3 KB · Views: 2,899
  • IMG_7950 (800x533).jpg
    IMG_7950 (800x533).jpg
    65.5 KB · Views: 2,871
congrats, hey I think there is a manual mode on that pid to lock in a percent of the temp, I use a dial to percent pid special build for my boil, they should do the same thing
 
Third batch today, and had my first boil over. It doesn't do any good setting the alarm value for the boil temp, and then forgetting to reset the alarm. Luck I was near. Had I gone upstairs, and relied on the alarm, it would have been a mess of epic proportions. Lesson learned. Trust, but verify. I'm going to watch for the boil from now on, alarm or not.
In the words of Mr. Scott from Star Trek, " The more complicated the plumbing, the easier it is to plug up the pipes" (add your own accent).

On the good side I got the lightning machine working!
 

Attachments

  • IMG_7966 (533x800).jpg
    IMG_7966 (533x800).jpg
    77.8 KB · Views: 3,637
  • IMG_7963 (533x800).jpg
    IMG_7963 (533x800).jpg
    56.7 KB · Views: 3,631
GernBlanston said:
In the words of Mr. Scott from Star Trek, " The more complicated the plumbing, the easier it is to plug up the pipes" (add your own accent).

Aye, Cap'n.
 
That looks great. Do you have a parts list just for the pipe used for the heat stick? I just recently decided to make a heat stick instead of installing an element in my pots.
 
I went the expensive route. Not on purpose. I just built what I thought would work. I welded a couple 2" tri clover flanges back to back. Then cut a hole and welded a stainless 3/4" pipe. Added an elbow, a strain relief, a couple 2" TC clamps and a 2" cap with a ground lug silver soldered to the inside. The hard part was to find a 2" TC end cap with 1" thread for the heating element. This I found at :

https://www.brewhardware.com/

The kick in the head is, that when I found the last part I needed, I found this:

http://www.brewhardware.com/product_p/hotrod.htm

Much cheaper than what I built. If I find a need for another one I will get one of these. No welding required. It doesn't come with the wire or the element, though Bobby sells them separately.
 
That's perfect and is a good price point from what I've seen looking around, and work free, which is fantastic.

Thanks!
 

Back
Top