- Joined
- Oct 21, 2013
- Messages
- 2
- Reaction score
- 1
- Points
- 3
We used Reflectix and it is working really well! In the interest of giving back, here's how we did it!
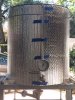
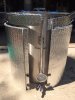
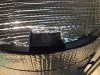
Our mash tun is a 30 gallon BrewBuilt kettle with a thermometer and a ball valve, both on the same vertical line. You could certainly adapt this method for a smaller kettle or one with a different configuration.
We wrapped our kettle with 2 layers of Reflectix, and it holds within 1 degree for well over an hour, and the temperature of the mash during the sparge held better than before as well. (We were using a different jacket, made out of older hot water heater insulation.) One could easily add a third layer if they wanted to using the same methods - we didn't think it was necessary.
1) Cut the Reflectix to height. The beauty of this stuff is that it is essentially very dense, strong, bubble wrap, with a metallic coating. So once you have marked it, you can put your staight-edge down parallel to the line of bubbles and you will be assured of making a cut that is parallel to the factory edge!
2) Starting from the back, wrap your kettle so that one edge butts up against where the ball valve comes out. (Wrap it in the same direction that it was rolled in. That will tend to keep it snug.) Mark the material so that it will butt up against that edge once you allow for the cut-outs. In other words, one side will stop at the ball valve, and the other side will go past the ball valve (w/ cutouts) to meet the first side.
3) Measure down from the lid to where the handles are. Make a single utility knife cut from the edge of each side back to the beginning of where the handles will be. Measure the handles and remove just enough of the material that the handles will fit through. This will create a long flap on each side.
4) Make your cuts so this first layer fits well, cutting out small semi-circles for the ball valve and thermometer ports.
5) With the first layer in place (hold it with blue painter's tape) wrap the second layer the same way. Or, if you'd like (we did) you can butt the material to the opposite side of the ports so that the two layers will overlap. Mark and cut as you did for the first layer, including for the handles.
6) Dry fit it all so that you are happy with the fit.
7) Remove the second layer. With the first layer still in place, apply adhesive to the outside of the first layer. (We used the adhesive that you use for sealing the glass around oven doors, so it is good for high heat. Probably overkill, but for $9.99 a tube, why not!) Wrap the second layer around the first, applying a little pressure here and there to assure adhesion. Hold again with blue painter's tape until the adhesive is dry.
8) We thought of a lot of fancy ways to hold this on (buttons, velcro, etc.), but opted in the end for the blue tape! It goes on and off without hurting anything, and since the only times the jacket is ever off the pot are during the initial heating to strike temp, and during cleanup, it clings beautifully with only the slightest bit of tape needed.
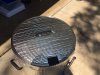
9) With the remaining Reflectix, cut out a couple layers for the lid, remove a little material for the handle to stick through, and glue them together. That's the easy part - we used scissors.
Our mash tun is a 30 gallon BrewBuilt kettle with a thermometer and a ball valve, both on the same vertical line. You could certainly adapt this method for a smaller kettle or one with a different configuration.
We wrapped our kettle with 2 layers of Reflectix, and it holds within 1 degree for well over an hour, and the temperature of the mash during the sparge held better than before as well. (We were using a different jacket, made out of older hot water heater insulation.) One could easily add a third layer if they wanted to using the same methods - we didn't think it was necessary.
1) Cut the Reflectix to height. The beauty of this stuff is that it is essentially very dense, strong, bubble wrap, with a metallic coating. So once you have marked it, you can put your staight-edge down parallel to the line of bubbles and you will be assured of making a cut that is parallel to the factory edge!
2) Starting from the back, wrap your kettle so that one edge butts up against where the ball valve comes out. (Wrap it in the same direction that it was rolled in. That will tend to keep it snug.) Mark the material so that it will butt up against that edge once you allow for the cut-outs. In other words, one side will stop at the ball valve, and the other side will go past the ball valve (w/ cutouts) to meet the first side.
3) Measure down from the lid to where the handles are. Make a single utility knife cut from the edge of each side back to the beginning of where the handles will be. Measure the handles and remove just enough of the material that the handles will fit through. This will create a long flap on each side.
4) Make your cuts so this first layer fits well, cutting out small semi-circles for the ball valve and thermometer ports.
5) With the first layer in place (hold it with blue painter's tape) wrap the second layer the same way. Or, if you'd like (we did) you can butt the material to the opposite side of the ports so that the two layers will overlap. Mark and cut as you did for the first layer, including for the handles.
6) Dry fit it all so that you are happy with the fit.
7) Remove the second layer. With the first layer still in place, apply adhesive to the outside of the first layer. (We used the adhesive that you use for sealing the glass around oven doors, so it is good for high heat. Probably overkill, but for $9.99 a tube, why not!) Wrap the second layer around the first, applying a little pressure here and there to assure adhesion. Hold again with blue painter's tape until the adhesive is dry.
8) We thought of a lot of fancy ways to hold this on (buttons, velcro, etc.), but opted in the end for the blue tape! It goes on and off without hurting anything, and since the only times the jacket is ever off the pot are during the initial heating to strike temp, and during cleanup, it clings beautifully with only the slightest bit of tape needed.
9) With the remaining Reflectix, cut out a couple layers for the lid, remove a little material for the handle to stick through, and glue them together. That's the easy part - we used scissors.