One upgrade leads to another!

Foster82

New Member
Trial Member
Joined
Jan 12, 2013
Messages
208
Reaction score
1
Points
0
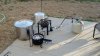
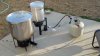
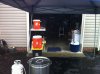
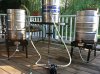
Why is it one upgrade normally leads to another. So in the past 2 month I have gone from a 7.5 gallon turkey fryer to a 16 gallon brewpot with a 200,000 BTU burner, and a fridge for a ferment chamber :D. I am thinking I better take the wife out to dinner. Tomorrow I brew mt first brew with the new setup, wish me luck.

On the left is the new pot and burner and on the right is the old setup that now will be used as a hot water supply.
 

Attachments

  • 2013-04-10_18-32-20_491.jpg
    2013-04-10_18-32-20_491.jpg
    84.2 KB · Views: 1,685
  • 2013-04-10_18-33-12_440.jpg
    2013-04-10_18-33-12_440.jpg
    95.2 KB · Views: 1,693
Very cool! It doesn't really ever end, but after the initial upgrade, it does level off. Building the shed was the big push for me personally, and thankfully my wife was very supportive of it. That was a LOT of work though...

My favorite brewing quote:
Give a man a beer he wastes the rest of the day, teach a man to brew, he wastes the rest of his life.
 
LarryBrewer said:
My favorite brewing quote:
Give a man a beer he wastes the rest of the day, teach a man to brew, he wastes the rest of his life.

:)
 
So now that I have a brew pot large enough for a 10 gallon batch, I think it is time for a mash tun.

What has everyone found to work best? Since I would like to due 10 gallon batches I don't want to fight with a 10 gallon water cooler and large grain bills, But I am thinking this cooler should work well.

http://www.walmart.com/ip/Igloo-70-Quart-Ice-Cube-MaxCold-Roller/16606386

The question is, would 70 quarts be enough space for say a 26 to 30 pound grain bill, plus boiling water to reach mash out temp?

Or should I just forget about the cooler route and go for a stainless steel setup, if so what is a good size?
 
My favorite equipment store is Craigslist. I Check it all the time.
 
If you can afford it, go stainless steel with a false bottom and a heating element so you can precisely control the MLT temperature.

A 70 quart cooler should be enough, but might cut it close on a 30 pound grain bill. My 48 quart MLT just barely handles 10 gallon batches with an OG around 1.040. I would get the rectangular style, not the cubic shaped one, because you want the grain bed to be more spread out.
 
Take a little time and play with the software. It will tell you what will fit in which size as far as grain and grist thickness. Brewing is like that article "Are Hops Addictive?" The more you brew the more you need. Dive in!
 
So this is starting to get a little out of control.

Check out the new grain mill. It is a clay/pasta machine from Micheal's with a few modifications. Was able to get it for $15.00 after the use of a 40% off coupon. All I really did was groove the rollers with a cut off wheel in my angle grinder and then built the hopper and base from scrape wood around the house. For a hand crank job it is a grain munching monster :D. I will post back on how long it take me to crush a 10-15 pound grain bill in a few weeks (all I had on hand to test was 3 pounds of 2-row). I guessing it will be in the 20-30 min range.
 

Attachments

  • IMG_7271.JPG
    IMG_7271.JPG
    74.8 KB · Views: 1,477
  • IMG_7270.JPG
    IMG_7270.JPG
    48.1 KB · Views: 1,458
Cool, a DIY grain mill. Would like to see pictures of the crush too.

Can you hook it up to a drill?
 
Ask and you shall receive. Initial testing seems to be promising, I did a one gallon test batch (A Strawberry Ale) and got 75% efficiency. I have the gap set at .040 but if can be adjusted. There are some post on other sites were people have used a drill to run them, but I don't believe the drive mechanism would hold up over extended motorized use, plus I don't mind cranking.
 

Attachments

  • IMG_7286.JPG
    IMG_7286.JPG
    117.4 KB · Views: 1,432
Looks good.

The plus side is hand cranking will build up your arm.
 
So an update on the DIY grain mill. Bottom line is save your 15 bucks. I ran 12 pounds of grain through the mill and it is ready to cry uncle. In its defense this was a grain bill for a milk stout, and I believe rocks may have crushed easier. The main issue is the drive roller rides on cheap plastic bushings that quickly wore out and now maintaining a consistent gap is impossible. The next part i see failing are the drive gears, which are thin and have very poor engagement (you can slide a nickle between the back side of the teeth). I could replace the bushing with bearings, but I am not sure if I want to through more money at a doomed project.

On the plus side I did get 74% efficiency my stout and hit may numbers spot on for the first time.
 
Well, it happens! I have been doing this hobby (obsession) for a litte over a year now and have progressed nicely.

Here is what I have been using this last year: 10g cooler mash tun, 5g cooler, HLT, 9g brew-pot, one burner, ice bath.


...and here is my upgrade ...the Binford 2000: 3 keg pots w/ brewmometers & false bottoms, 2 burners added


Pump & hoses wern't included so I need to source those.
 

Attachments

  • Coolers.JPG
    Coolers.JPG
    98.1 KB · Views: 687
  • Kegs.JPG
    Kegs.JPG
    136.2 KB · Views: 644
That's awesome! I foresee a brew sculpture in your future.
 

Back
Top