Ok, success! I used the heat-shrink wrapper thingies from NortherBrewer.com and they worked like a charm. Took about 3 tries to figure out how to hold the wrap and the label before dunking them in the boiling water. It took quite a few more tries to figure out how to best position the printed paper labels behind the plastic. It was way easier than it first seemed.
The instructions that came with them said to use a knife or tweezers to get the paper lined up just right. Found it is way simpler to just place a thumbnail on the outside of the plastic just above or below the label and slide it into place. It was one of those things that I had already told myself there was no way it would work...but it did! Easily and flawlessly.
Once I figured out how far the shrink wrap was going to "slide" down the sides of the bottle when dipped, it was a simple matter to get them lined up correctly ahead of time and just dip them quickly and efficiently. The only other problem I ran into was my really tall 22oz bombers weren't completely submerged in the water (thought I had checked that ahead of time, but maybe I didn't; maybe the water evaporated enough to make it an issue). So, I just trimmed the excess at the top with a sharp knife.
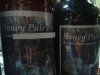
I couldn't use my color printer because the cartridge was out of the ink required to print two or three shades (magenta looked arterial red, cyan looked dark blue, and yellows printed mostly black/dark). So, I opted for black & white labels and had to redo the graphics for the new color-less scheme.
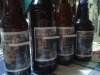
A pic..a closeup..and the original graphic before printing. Just going for something simple, and just wanted to get it printed and the beer bottled and the whole thing over with. Took too many hours... :-(
And it's much easier to read the labels in person. My cell phone camera sux. Oh, and ignore that little white line thing on 3 of the bottles; that was a joke, where I whited out the names of the Mark & Zach who didn't show up for bottling. I was just trying to get them riled up. ;-)