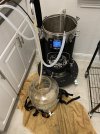
Brewzilla? Anyone have one and can give some advice?

Ah, thank you. I guess it could be put on a stand(?) so it’s easier to prime the pump but one of the things I’m afraid of is a big mess- I hardly ever make a mess in my current set up, but it’s flippin’ heavy stuff!
I don't make a mess to often, usually only if I am trying to do more than one thing at once.
I just put a dish pan under the hose when I disconnect the suction line from the CLOSED bottm valve.
 
I've had my Brewzilla 3.1.1 for almost 4 years now, and have some comments. You will most likely get a BZ 4, which has some nice improvements.

1. Temperature calibration: You will need to adjust the temperature display to match the actual measured mash temperature. until you do, the brew day will be modestly frustrating. Mine was off by 9 degrees F. While I'm sure the display was accurately showing the sensor temperature, the mash temperature definitely differed by 8-10 F, even while recirculating.

2. Lifting the mash pipe: Since the BZ4 has the display & controls near the top, it works fine with the entire thing on the floor. It is then trivial to rig up a pulley system. But, if you enjoy lifting 12+ pounds of water-soaked grain (30+ lbs) straight up about 2.5 feet, have at it.

3. Recirculating: You'll find better efficiency and temperature distribution if you recirculate almost continuously, and maybe stir once after 20 minutes. It will overflow if you go too fast (the pump can move a lot of liquid!), half-open is plenty fast and should be OK. Rice hulls help too, I use them in every batch, 1/2 lb for most recipes, 1 lb for wheat beers.

4. Hoses: Like @Craigerr does, get some longer silicone hoses and pump everything everywhere - from boil through counterflow chiller into fermenter. Save your back for later.

5. Voltage: You definitely want the 220V version. Even if an electrician needs to visit the house to make it happen. The 110 V version is underpowered.

6. Accessories: Get yourself a jacket for it, or make one. It gets hot, and having a jacket helps prevent accidental burns. I very much like the clear polycarbonate sight glass that replaces the stainless steel up-pipe from the pump, but they only last 2 years or so. Buy a couple spares. And I bought a whirlpool attachment pipe, not for whirlpooling buy for a much easier hose connection out to the fermenter.

7. Last: If you have a way to manage boil moisture, great, but if not, start thinking of one.
Great points, forgot to mention i also use hoses the same way to cool down the wort. I am thinking about the sight glass
 
Thanks!!!!!! Of course that brings up more questions.

1. I don’t have a problem checking mash temps, but how easy is to then calibrate?

2. No way I’ll be allowed to do a pulley or anything like that in the drop ceiling. Or anything that would put weight on anything except a shelf (which there is not space for, nor the studs). I’m pretty strong, but still don’t like the idea and potential mess. but if I understand, you pull it up and let it sit? so it’s not so drippy when I move to my bin to take to the compost?

3. Great tip- thanks! I haven’t used rice hulls in a long time and wouldn’t have them on hand so I can order some with grain.

4. I’ve gone tons of extra silicone hoses- what kind of connections are there? I can’t picture it, so just trying to get it in my mind. I have cam-locks and a couple of others from past builds on hand, so maybe I won’t have to invest in any new ones. I love the cam locks.

5. I have 240V, no problem. My control panel’s one PID is shot, and I don’t feel like replacing, but I am thinking I could keep the CP and use the outlets in it for things on 120, like a fan, or light, or other external appliance and keep it for the new all-in-one. Or not. Depends on what I really end up with, and how convenient it is to move in and out of place.

6. Great tips there too! Can you explain the whirlpool attachment pipe? Can you not whirlpool without it? (again, visual learner here!).

7. My current moisture management is simple, but yet seemingly effective. It’s a fairly dry climate for the midwest, especially in spring/fall (I don’t brew there in the winter but it’s bone dry in the winter), so right now with my huge system it’s just turning on a fan and opening the door. Without that, once someone closed the door, it did turn a little into a steam room, but with the door open and bring by the door and the fan (or on nice days, just outside that door), it seems pretty good. When I brewed in the winter, I turned the fan the other way for much needed moisture in the house. I’m hoping that will still be the case.
1. Cslibration takes 2 minutes. Just press some buttons to get into calibration mode, and make an adjustment so the display matches your thermometer.

2. Ok. It isn't like lifting a Saturn V.

4. Mostly hose barbs. One cam lock.

6. See this.
You can whirlpool without it, but whirlpool in a BZ is pointless: the pump intake is at the center of the bottom, guaranteeing you get all the trub. Unless you use the spout near the bottom, but then the pump is out if the loop.

I use the arm outside the kettle simply as a very long and oddly-shaped hose barb.
 
I've got a 3.1.1. Very happy with it, but I'd get a 4 if I was looking now. There's a few improvements, but just the advantage of having the control panel at the top and easier to work with is enough of a difference. I'm sick of lying on the concrete to change the temperature.

I find everything a little easier with a brew bag. If it's a smaller batch I'll just use the bag, if it's larger I'll put the bag inside the pipe. I'll put it up, let it drip, then twist the bag to get more out. Getting the circulation flowing seems easier with the bag than just the malt pipe. I hear the 4 is better for this, so it may not be needed for that.

I also find using a few silicone hoses and camlocks makes everything a little simpler. Once the mash is finished, the arm comes off and I just use the hoses. Add camlock and hose fittings to the chiller to make it even simpler. I've got an old counterflow from a previous experiment system, so that was easy to fit, but I've seen similar fittings for the immersion chiller as well.
 
The time has come. I'm about ready to go small, and so 5ish gallon batches from now on. My big system is just too big, too much, too heavy, and I'm ready to downsize. I rarely do larger batches these days and I love the idea of an all-in-one.

I saw a Grainfather in action a few years ago, and was not happy by what seem to be messy, and lifting up the grainbasket seemed like a huge pain.

One of my friends over at Homebrew Happy Hour (podcast) told me his dad loves his Brewzilla Gen 4. I looked at it online, but really love some advice from Brewzilla owners about the messiness (I brew indoors, in my laundry room) and the real-world cleaning, etc.
I used one a few times a could years ago and it was pretty nice. I have a Grainfather S40 that I use a brewbag in the malt pipe but yeah it's got some weight. Though I think they all suffer from that? You could easily set up a pulley system though too to lift the basket out if that's a serious concern.

Edit: See the comment about the pulley, a staged lift could be quite useful for you then. I brew beside my tub sink in the basement so I just move between them to let it drip until it is light enough to dump.
 
Oh, and one more thing - this device is easy-peasy to clean, even with the eventual boilover.
This is super true! I like being able to clean the grain basket while finishing the boil.
My brewday is down to 4 hours if everything goes as planned.
I have a 3.1.1 as well and I brew in the kitchen, plugging directly into an outlet under my sink.

My tips:
After sparging I put the grain basket in a large pan on the counter to collect all the wort that continues to drain while I ramp up to a boil.
I also set it up on a beach towel and raise it up on a milk crate, because I always manage to drip or splash something on the floor.
I use the pump to transfer into my fermenter making sure to splash as much as possible to add oxygen.
For a stuck pump you can simply blow air back through pump then drain some wort out the spigot to get any grain out from under the false bottom.
 
The time has come. I'm about ready to go small, and so 5ish gallon batches from now on. My big system is just too big, too much, too heavy, and I'm ready to downsize. I rarely do larger batches these days and I love the idea of an all-in-one.

I saw a Grainfather in action a few years ago, and was not happy by what seem to be messy, and lifting up the grainbasket seemed like a huge pain.

One of my friends over at Homebrew Happy Hour (podcast) told me his dad loves his Brewzilla Gen 4. I looked at it online, but really love some advice from Brewzilla owners about the messiness (I brew indoors, in my laundry room) and the real-world cleaning, etc.
Hi - You have probably gotten all you need, but here is additional.

Last summer I bought my BZ gen 4. About 12 5G batches have been brewed in my laundry room, though I have rolled it outside the last couple of times because of the beautiful weather - have it mounted on the dolly. Care and attention will keep your laundry room spotless! Early on I mishandled lifting the grain basket and it fell back into the wort with significant splashes all over the place - will never do that again! And once i inadvertently left the pump valve open and accidentally turned on the pump spraying some wort. Those mistakes were in the first two batches - and will never happen again.

To note, I had brewed 37 5G batches over a propane burner with siphon pump, so to say the investment is worthy would be a big understatement!

I agree with most of the other BZ comments, although I did hold out for the gen 4, in the midst of tempting discounts on clearing out the gen 3. The pump has performed flawlessly and I do use rice hulls in the process to assure a "cleaner" pump out. I have the 110v version and have no problems with it.

Attached are pictures of my laundry room setup.

Best of luck with your decision, and happy brewing!

Wayne Alexander
Brewing in North Texas since 2019 - my next batch marks 50 batches keeping my 3 taps filled!
Tapping a Kolsch this weekend!
 

Attachments

  • IMG_1883.jpeg
    IMG_1883.jpeg
    261 KB · Views: 48
  • IMG_1461.jpeg
    IMG_1461.jpeg
    202.8 KB · Views: 49
  • IMG_1457.jpeg
    IMG_1457.jpeg
    221.5 KB · Views: 48
I started with the BZ gen 3 (gift from my son) and recently upgraded to the gen 4 (so my son can inherit the 3). I have about 30 brews so far.

I liked the 3 but the 4 is better - the second steps, control on the top, larger capacity, etc. - I brew in the garage and haven't had any mess issues which I did with the 3. Probably due to the larger capacity so less chance of a boil over and experience. I had the clear site for the 3 and wish we had the same for the 4. Haven't had issues with the pump clogging but the 4 requires a bit more care in cleaning out the pump.
 
I got a brewzilla gen4 for Christmas, brewed twice, and just got the steam condenser but haven't used it yet.

The main things that I liked over the competition was

The concave centered drain hole makes emptying and cleaning super easy, but you do get all the trub if you're not filtering.

The app and Bluetooth is actually pretty handy for me, mostly for scheduling my stroke water. I can setup the day before, fill the water up, add the treatment chemicals, and mill the grain. Then program the strike temp and have it the water be at temp when I come down to make my coffee or even turn it on when I'm driving home from work.

I did get the little plastic CIP hose spinner thing, I have an actual CIP for keg washing so I'm curious to see how this compares. Haven't tested yet but the YouTube vids seems effective?

The scalable % based heat and pump settings, but I recommend dialing in the pump with the valve instead of the % setting after trying both.
 
Like you, I didn't particularly need Bluetooth and never liked the price point of Grainfather, since I could get two BZ systems for equivalent cost. I started with a 65l Brewzilla v3.1 220v that I use for most brewing. I now have the extended mash tube and collar, and that was a total game-changer, especially when doing high-gravity beers. I first used a 35l Robobrew 110v for sparge, later upgraded to a v3.1 board, with added feet for board cooling. I recently acquired a 35l Brewzilla v3.1.1 110v on close-out when the Gen4's first came out. I use all three systems, typically the 65l for mash and boil since it's 220v, and the 35l's for sparge water or other needs. If you have option go for the 220v, but the 110v does work, mashing seems comparable it's just slower to boil. When I kettle sour I usually mash a 13 gal double-batch in the 65l and split the clarified wort between the two 35l's and they keep temp for souring. Then I just hop and boil the individual batches in the 35l's. I can also separate off half of the 13gal base wort into a smaller kettle to adjunct or hop differently. I used all male camlocks on my hoses, and corresponding female fittings on my CF chiller, and this makes it easy to configure transfers back and forth between the kettles and/or chiller. For example, I'll hook a hose to the recirc on my big kettle, and I can backfeed wort to fill a smaller kettle through their recirc. I can also use a small kettle to quasi-decoct some first runnings, and return to main kettle, or I can also underlet if needed to reset the grain bed to free up a slow lauter, although copious rice hulls certainly help to avoid that. I've been playing with LODO recently, so I can also underlet hot liquor from the smaller kettle into larger kettle when mashing-in. I mounted my CF chiller, stainless spiral type, vertically next to my big kettle with the outlet a few inches above the rim, so all the liquid drains back into the kettle when I disconnect. I don't lose any wort from hoses or chiller because gravity completely drains everything back into the kettle. A good friend recently bought a Gen4, and after brewing with it, he and I are both NOT fans of that center drain. As others mentioned, it might work good for cleaning but it precludes the ability to whirlpool and clarify your wort. I don't know about others, but as for my priorities, I want a system that first and foremost brews beer well; I don't particularly need or want a system that cleans itself real good at the expense of or complicates the making of beer... It would be nice to have both, but having to choose one over the other, I'd forgo cleaning convenience and instead go for beer-making features... My 3.x.x series with offset raised intake for the pump helps to keep coagulated proteins and hop matter from getting into the pump. In addition, my friend had to buy an extra heat-distribution disk to use in the bottom of his Gen4, because of the way heat convection works with the center pump inlet. So essentially Gen4 requires an extra purchase to fix what I consider a design mistake. KegLand, are you listening? I like most KegLand stuff, it's innovative and usually very well thought out, but IMHO that Gen4 center drain was a huge step backward in functionality... I do a lot of heavy hops and whirlpooling, and having used 3.x.x series and Gen4, I would not buy a Gen4, precisely because of that center drain. All three of my Robo/BZ systems have been working fabulously over many years and brews, but I recently noticed the pump in my 65l seems weaker than it should be. So I bought one of the big green pumps they have now for the Gen4's, and I plan to fabricate a mount to adapt it to my 65l v3.1. Also, the CIP spray ball I use wasn't as robust as I'd like with the stock pump, so the larger pump should also give me a better spray pattern and force. I have experience with 7bbl and 10bbl brewhouses, and IMO having a sprayball to hot-CIP is such a nice convenience, set it and forget it, come back later and all is clean. Anyway, overall I'm very happy with my Robo/BZ's 3.x.x's. For anyone considering a Gen4, just know it works exactly as designed, you can make good beer, but with some extra effort...
 
The time has come. I'm about ready to go small, and so 5ish gallon batches from now on. My big system is just too big, too much, too heavy, and I'm ready to downsize. I rarely do larger batches these days and I love the idea of an all-in-one.

I saw a Grainfather in action a few years ago, and was not happy by what seem to be messy, and lifting up the grainbasket seemed like a huge pain.

One of my friends over at Homebrew Happy Hour (podcast) told me his dad loves his Brewzilla Gen 4. I looked at it online, but really love some advice from Brewzilla owners about the messiness (I brew indoors, in my laundry room) and the real-world cleaning, etc.
I've had the Robobrew V3 (previous name for brewzilla) for some time now and love it. Brewing is super easy and lifting the grain tube /basket is straight forward. Compact system, great for tight spaces and clean up is fairly easy especially compared with a 3 pot herms system or similar set up. Just an fyi you will still need a 2nd pot for sparging so I use a 10lt stock pot. Also very well priced here in OZ is 1/2 price of a Grainfather so its no brainer as build quality is very similar...Cheers
 
I've had the Robobrew V3 (previous name for brewzilla) for some time now and love it. Brewing is super easy and lifting the grain tube /basket is straight forward. Compact system, great for tight spaces and clean up is fairly easy especially compared with a 3 pot herms system or similar set up. Just an fyi you will still need a 2nd pot for sparging so I use a 10lt stock pot. Also very well priced here in OZ is 1/2 price of a Grainfather so its no brainer as build quality is very similar...Cheers
Nice. When I sparge, I use a spaghetti pot with our sous vide heater.
 
I've had the Robobrew V3 (previous name for brewzilla) for some time now and love it. Brewing is super easy and lifting the grain tube /basket is straight forward. Compact system, great for tight spaces and clean up is fairly easy especially compared with a 3 pot herms system or similar set up. Just an fyi you will still need a 2nd pot for sparging so I use a 10lt stock pot. Also very well priced here in OZ is 1/2 price of a Grainfather so its no brainer as build quality is very similar...Cheers

How big of a batch can you make no sparge? I’ve been doing no sparge for a long time (full volume mashes) and I really want to continue.
 
In many cases I need to sparge only to get close to my volume. Really I consider it a rinse. Without that I might get 4 gallons into the fermenter at best.

The 'sparge' can be room-temperature as well, simplifying things.

The BZ can handle 8 gallons, but adding grain requires the water to be less. I generally mash with 6.25 gal, which really leaves plenty of space to avoid spillover from the malt pipe.
 
most of these all-in ones are relatively the same size, I use 2.5 for my water grain ratio, that gives me just a couple of gallons or so to clean off some of the grain in the raised basket for a 6.5 gallon batch at around 5%
 
Last edited:
The time has come. I'm about ready to go small, and so 5ish gallon batches from now on. My big system is just too big, too much, too heavy, and I'm ready to downsize. I rarely do larger batches these days and I love the idea of an all-in-one.

I saw a Grainfather in action a few years ago, and was not happy by what seem to be messy, and lifting up the grainbasket seemed like a huge pain.

One of my friends over at Homebrew Happy Hour (podcast) told me his dad loves his Brewzilla Gen 4. I looked at it online, but really love some advice from Brewzilla owners about the messiness (I brew indoors, in my laundry room) and the real-world cleaning, etc.
Hi,

I bought a Brewzilla. I was disappointed. I have attempted to calibrate the thermostat numerous times, and I mean 8-10 times with Ice water, boiling water and everything in between and it remains rouge. The temperature often under reads and then suddenly its way over 10 degrees and more. I would describe it as a hopeless bit of kit. I did discuss the problem with Kegland the maker and the distributer. They were trying to get me to buy another thermometer at a huge price. Essentially the problem was not theirs it was mine. I use it now with a dome bottom and I work the system manually switching the element on and off manually. I think there is a design error in the equipment, in that it is tall and thin. The temperature striation between top and bottom is huge without stirring continuously. I would get a cheap wide Chinese urn $ 100 and an ink bird $50 and fit it with a false bottom $ 30 and a nylon brew bag $ 15 . Sometimes simpler is better. In this case it certainly is.
 
@Yooper I have been using both the 5 and 10 gallon brewzilla for 6 or so years now. I enjoy the unit and find that if you recirculate after the 1st 10 minutes through till you are ready to sparge (or no sparge) then the temperature stabilizes through the mash. I have verified this with temp probes resting in two separate spots within the mash - I will be posting a full video to youtube at some point that shows it ... if I can, I can try and post the snippit here before then if you are really interested. Ultimately though, once I had brewed on it a couple times, I found my nuances and how to work with them. I ultimately found consistency and satisfaction - faster than with any other methods I had tried in the past. The temperatures were certainly more stable then when I used a burner.
Pulling the grain basket on the 5 gallon wasn't bad but with the 10 I installed a pulley and eventually a rail to move it up and out of the way.
 

Back
Top