- Joined
- Mar 16, 2017
- Messages
- 1,616
- Reaction score
- 1,854
- Points
- 113
Hanging around this forum for the past 3 years +/-, I’m so impressed with the various approaches members take to yield their beloved Home Brew. Some brew with scientific like approach and precision (and expense), while others take a less detailed approach and the rest of us fall somewhere in between.
I thought it’d be kind of cool to see how everyone does homebrew by describing their approach.
The level of detail is up to you, but to stay things off, here’s my approach to a typical brew from concept to first pour.
We typically brew 5 gallon batches on Sundays early in the morning around 5:00am in the detached garage and are ready for yeast Pitch by 9:00am the same day. We spin up a yeast starter by 8:00pm the previous evening.
We use a 3 tier All Grain system with a Box store converted Stainless Steel 5 gallon HLT with a 3 piece valve and thermometer that I DIY’d. The Mash Tun is a 10 gallon converted round cooler with a stainless steel false bottom. The boil kettle is a purpose purchased 10 gallon boil kettle from Spike Brewing that has just a 3 piece valve on it. I use a Blichmann propane burner to do all the heating.
Since our well water is high in iron, we use bottled spring water for every brew. We don’t make water adjustments, nor do we test pH at anytime during brewday.
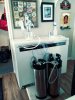
We ferment in an Ss Brewtech, 7 gallon BrewBucket, with a heating belt that is controlled by and Inkbird temperature controller.
First thing I do when I get to the garage is use the Brewers Friend Infusion Calculator to determine how much and what temperature the strike water needs to be for mashing. Once the strike water volume and temperature is met, I transfer via gravity,to the mash tun onto the grains that are already in place. Mix thoroughly and take a temp check to assure mash temp is correct. We place a foil cap over the mash and place the lid on the mash tun and wrap the tun with an old blanket/comforter. While the mash is underway, I fill the HLT with sparge water and slowly heat it to around 170 (f). When the mash is complete, we remove the blanket, lid and foil cap and verify/document the end mash temperature. We vorlauf and lauter enough to where there’s no more grains coming out. We lauter over a spaghetti strainer with a small foil square on the bottom and swirl the lauter so as not to allow channeling. Then we open the valve around halfway and drain through a silicone hose directly into the Boil Kettle. We usually end up with around 2.5 gallons of first runnings.
For sparging, we add water with a pitcher until the grain bed in the mash tun is just covered with sparge water, then gently stir the top third of the grainbed and repeat the vorlauf and lauter described above and resume draining to the boil kettle. We try to keep sparge water level just above the grain bed. We keep pouring until we reach kettle volume, then move the boil kettle onto the propane burner and start the boil. The remaining wort in the mash tun is drained and fed to the deer along with the spent grains.
During the boil, we don’t use a hop spider or similar filter bag to manage the hop debris, we collect all that when transferring to the fermenter.
We add yeast nutrient and Whirl floc With 10 minutes left in the boil.
We haul the boil kettle back to the house and place the boil kettle directly into the laundry tub with a cookie cooling rack placed in the bottom of the tub. We fill the laundry tub with water and ice and stir the ice for around 15 minutes to get to yeast pitch temperature.
We transfer everything in the boil kettle directly into the fermenter, but use a hop filter to catch the flow between the boil kettle and the fermenter to remove all the hop debris and other materials while aerating at the same time by splashing its way into the fermenter.
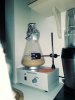
I seal up the fermenter and give it a good shake for no more than 5 minutes, pull a sample for OG, then pull the yeast starter off the stirplate and pitch the yeast, then connect up to the Inkbird temperature controller and the fermenting begins.
I don’t use the “Brew it” feature on brewers friend as our process is so ingrained in our routine that the checklist is not necessary for us.
I thought it’d be kind of cool to see how everyone does homebrew by describing their approach.
The level of detail is up to you, but to stay things off, here’s my approach to a typical brew from concept to first pour.
We typically brew 5 gallon batches on Sundays early in the morning around 5:00am in the detached garage and are ready for yeast Pitch by 9:00am the same day. We spin up a yeast starter by 8:00pm the previous evening.
We use a 3 tier All Grain system with a Box store converted Stainless Steel 5 gallon HLT with a 3 piece valve and thermometer that I DIY’d. The Mash Tun is a 10 gallon converted round cooler with a stainless steel false bottom. The boil kettle is a purpose purchased 10 gallon boil kettle from Spike Brewing that has just a 3 piece valve on it. I use a Blichmann propane burner to do all the heating.
Since our well water is high in iron, we use bottled spring water for every brew. We don’t make water adjustments, nor do we test pH at anytime during brewday.
We ferment in an Ss Brewtech, 7 gallon BrewBucket, with a heating belt that is controlled by and Inkbird temperature controller.
First thing I do when I get to the garage is use the Brewers Friend Infusion Calculator to determine how much and what temperature the strike water needs to be for mashing. Once the strike water volume and temperature is met, I transfer via gravity,to the mash tun onto the grains that are already in place. Mix thoroughly and take a temp check to assure mash temp is correct. We place a foil cap over the mash and place the lid on the mash tun and wrap the tun with an old blanket/comforter. While the mash is underway, I fill the HLT with sparge water and slowly heat it to around 170 (f). When the mash is complete, we remove the blanket, lid and foil cap and verify/document the end mash temperature. We vorlauf and lauter enough to where there’s no more grains coming out. We lauter over a spaghetti strainer with a small foil square on the bottom and swirl the lauter so as not to allow channeling. Then we open the valve around halfway and drain through a silicone hose directly into the Boil Kettle. We usually end up with around 2.5 gallons of first runnings.
For sparging, we add water with a pitcher until the grain bed in the mash tun is just covered with sparge water, then gently stir the top third of the grainbed and repeat the vorlauf and lauter described above and resume draining to the boil kettle. We try to keep sparge water level just above the grain bed. We keep pouring until we reach kettle volume, then move the boil kettle onto the propane burner and start the boil. The remaining wort in the mash tun is drained and fed to the deer along with the spent grains.
During the boil, we don’t use a hop spider or similar filter bag to manage the hop debris, we collect all that when transferring to the fermenter.
We add yeast nutrient and Whirl floc With 10 minutes left in the boil.
We haul the boil kettle back to the house and place the boil kettle directly into the laundry tub with a cookie cooling rack placed in the bottom of the tub. We fill the laundry tub with water and ice and stir the ice for around 15 minutes to get to yeast pitch temperature.
We transfer everything in the boil kettle directly into the fermenter, but use a hop filter to catch the flow between the boil kettle and the fermenter to remove all the hop debris and other materials while aerating at the same time by splashing its way into the fermenter.
I seal up the fermenter and give it a good shake for no more than 5 minutes, pull a sample for OG, then pull the yeast starter off the stirplate and pitch the yeast, then connect up to the Inkbird temperature controller and the fermenting begins.
I don’t use the “Brew it” feature on brewers friend as our process is so ingrained in our routine that the checklist is not necessary for us.

 .
.