- Joined
- Jul 16, 2013
- Messages
- 147
- Reaction score
- 1
- Points
- 16
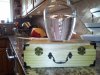
Taking the brewing to the next level and going to start doing starters.
I am of the mindset if there is inexpensive way to accomplish something, thats the way i am going to try.
Wood box from Hobby Lobby $4.99 ( watch for 50% of sales then it is only $2.50)
Stir Sticks $4.50 each LHBS
Rare earth magnet $Free
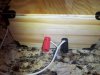
Binding posts $3.70 (not required, but makes it easy to switch power input)
Misc hardware $4.00 (4 bolts, 4 Nuts, 4 washers, and 4 rubber bushings/spacers)
Computer fan $Free
1L "flask" $free ( vase from flowers I bought my wife, so in reality probably cost me $50 :lol: )
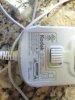
5V power supply $Free
Total cost $17.20 vs $80+
Total ROI, 2 batches saves me $15 from buying multiple vials, AWESOME!
Instructions
1. Take magnet and get it balanced on the fan with as little wobble as possible. Use a standard battery to slowly turn the fan while testing balance.
2. Once balanced mark the magnet and fan in at least 2 spots.
3. Glue magnet to the fan with strong glue! Let dry 24 hours.
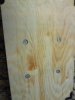
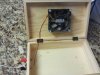
4. Find the center of the top of your box.
5. Measure the width of your fan.
5. From the center go out to all 4 sides half the width of your fan. Use a square to draw lines. When finished you should have an outline of your fan in the center.
6. Mark and drill your mounting holes. You will need your bolt heads recessed to create a flat surface so keep that in mind when drilling, and when purchasing bolts.
7. Mark and drill your binding post holes. Make sure your fan wires can reach them.
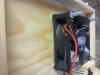
8. Install bolts through lid and place washers/spacers/bushings on the inside. Install fan. Make sure it can freely spin, if it cannot add a little more space. ( I found perfectly sized rubber bushings that fit my fan holes, so I installed those, along with 1 washer and it spaced it perfectly) Install nuts. Recommend a touch of threadlock to keep them tight.
9. Strip black and red wire on fan ( your wire colors may be different ) and solder them to the inside of the binding posts.
10. Strip ends of wires from wall wort or other power source. Install onto binding posts.
11. RWDAHB and let your yeast grow!
Afterword: You can get all fancy and add potentiometers, and power switches, etc etc etc. But I just wanted a simple functional box to grow my yeast.
I am of the mindset if there is inexpensive way to accomplish something, thats the way i am going to try.
Wood box from Hobby Lobby $4.99 ( watch for 50% of sales then it is only $2.50)
Stir Sticks $4.50 each LHBS
Rare earth magnet $Free
Binding posts $3.70 (not required, but makes it easy to switch power input)
Misc hardware $4.00 (4 bolts, 4 Nuts, 4 washers, and 4 rubber bushings/spacers)
Computer fan $Free
1L "flask" $free ( vase from flowers I bought my wife, so in reality probably cost me $50 :lol: )
5V power supply $Free
Total cost $17.20 vs $80+
Total ROI, 2 batches saves me $15 from buying multiple vials, AWESOME!
Instructions
1. Take magnet and get it balanced on the fan with as little wobble as possible. Use a standard battery to slowly turn the fan while testing balance.
2. Once balanced mark the magnet and fan in at least 2 spots.
3. Glue magnet to the fan with strong glue! Let dry 24 hours.
4. Find the center of the top of your box.
5. Measure the width of your fan.
5. From the center go out to all 4 sides half the width of your fan. Use a square to draw lines. When finished you should have an outline of your fan in the center.
6. Mark and drill your mounting holes. You will need your bolt heads recessed to create a flat surface so keep that in mind when drilling, and when purchasing bolts.
7. Mark and drill your binding post holes. Make sure your fan wires can reach them.
8. Install bolts through lid and place washers/spacers/bushings on the inside. Install fan. Make sure it can freely spin, if it cannot add a little more space. ( I found perfectly sized rubber bushings that fit my fan holes, so I installed those, along with 1 washer and it spaced it perfectly) Install nuts. Recommend a touch of threadlock to keep them tight.
9. Strip black and red wire on fan ( your wire colors may be different ) and solder them to the inside of the binding posts.
10. Strip ends of wires from wall wort or other power source. Install onto binding posts.
11. RWDAHB and let your yeast grow!
Afterword: You can get all fancy and add potentiometers, and power switches, etc etc etc. But I just wanted a simple functional box to grow my yeast.