


Brew Shed Slab Is Poured
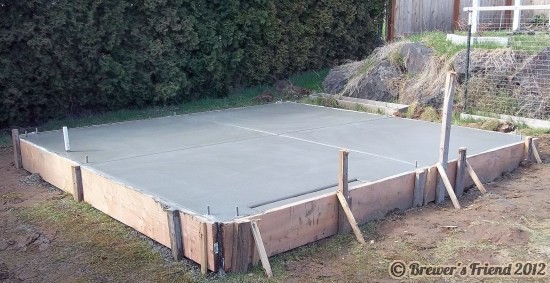
Saturday, April 16th, 2011The brew shed has gone from the drawing board to reality. The slab has been poured! Late into the evenings last winter I had been making plans for this project. Now it is underway! Next step is to frame and roof it. That will be happening soon and I will post pictures.
May I remind our readers: You know you are seriously addicted to home brewing when you start making plans for a brew shed!

Details about the slab:
- 12′ x 12′
- Mono pour
- 4” thick
- 6” wide footings around the edge 8” deep, reinforced with rebar
- Vapor barrier
- Wire mesh
- J-bolts (achor bolts), three per side, which the treated sill plate will bolt to.
- Made space for door jamb
- 4 hops plants already added out front.
- Total cost: $1200.
You can get the price down on the slab if you do it yourself. The bill from the concrete ready mix truck was under $300. Be prepared to dig and level the area first. Then add a base of gravel and tamp. Then install the forms, haul in more gravel, tamp, etc… It adds up to many hours of hard labor. Not being an expert at this, or knowing anybody who was willing to help, writing a check was the simplest solution. I plan to use my wood working skills and help out with the framing in the next phase.


Ideas for an over the top brew shed foundation:
- Go with stamped and dyed concrete pattern. It is amazing what can be done with decorative concrete. This was more than double the price. Someday I might cover my basic gray floor in tile, but I don’t have immediate plans.
- Acid stain over the concrete – this looks good too, and is more affordable than a stamped pattern.
- Polished finish, again for looks more than anything. My concrete guy said it would cost about $300, or I could rent the machine.
- Add in your plumbing pipes ahead of time – floor drain, sewer line, supply line. I opted out of these for cost reasons.
- Add insulation underneath the slab. This can really help if you plan to make it climate controlled.
- Design the layout of the building with hops in mind. Plan to cover the shed in hops! I have already planted 4 new rhizomes on the southern exposure.
Alternative Designs:
I considered doing posts supporting a wooden floor. Ultimately a wooden floor is just about as much work as a slab. The slab will perform better and last longer. With a suspended floor animals can tear up insulation from underneath. Oregon is really wet too, and I figured the concrete would hold up better.
Stay tuned for more from Brewer’s Friend!


One Response to “Brew Shed Slab Is Poured”
Looks pretty awesome! I lucked into a single car garage/workshop that I could use as a brewery because we’ve got 4 other spots to park the cars. I just wished it had plumbing for clean up and such.
Looking forward to seeing the rest of the build.
By J.T. Ross, Breakpoint Brewery on Apr 16, 2011