


Yeast Washing 101
Saturday, January 30th, 2010Yeast washing is a simple, yet useful procedure that will allow you to harvest, store, and re-use yeast from your own yeast bank for pennies per brew session. Please review how to make a starter and why a stir plate to help you best re-activate your yeast after cold storage.
SANITATION: You must sanitize everything in this process! Storing yeast successfully is fully dependent on keeping the samples pure.
YEAST STOCK: You will harvest the yeast that you are about to wash and store from a recently (same day) emptied fermenter. This yeast cake or slurry will be the basis for all that you are about to do. This is the yeast that will go on to propagate new colonies in future brews. See Fig 1
Fig 1.

HARVESTING: After racking the fermented beer from atop a yeast cake, there will generally be some liquid left along with the yeast cake. Swirl this around and loosen the yeast cake so that you can pour the slurry (sometimes chunks) of yeast into a sanitized flask or 1 gal. carboy. You want plenty of spare volume. Your yeast slurry will be full of trub, some break material, and hop particles. Currently, it is probably looking VERY thick and has no defined layers, though we are about to fix this! Fig 2
Fig 2.
WASH: You will want to have about a half gallon (ample amounts) of boiled and cooled water on hand (so we don’t cook the yeast). In your flask or carboy use enough of this water to double or triple the volume of the slurry that you currently have. Give it a few swirls to mix all of the contents (slurry and water) together. Cover with sanitized foil. See Fig 3
Fig 3.

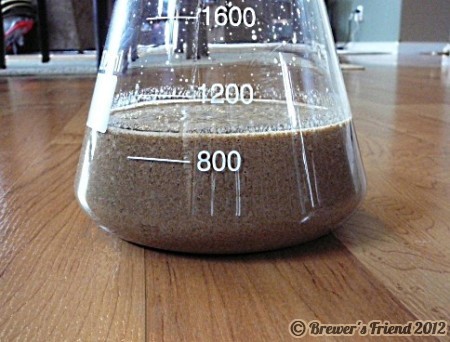
WAIT: Given as little as 15-20 minutes to sit, you will be able to see some drastic stratification in your slurry. The heavier particles, trub, and break material will settle out quite quickly, leaving a dark layer with progressively lighter layers above it. Atop these dark layers you will have a creamy layer of liquid. This is what you want, water and yeast in suspension. See Fig 4
Fig 4.

SEPARATION: You will want to have several sanitized jars available to decant this creamy, yeast filled liquid into. Pour the creamy liquid containing the suspended yeast off of the sediment and into as many jars as it takes to hold it. Now you will have 2-4 jars full of this creamy looking liquid that you will place sanitized lids on, and then place into the refrigerator. See Fig 5. After some time has passed in the fridge you will see that the liquid is now much clearer and there is a nice bright layer of clean yeast at the bottom of each jar. See Fig 6
Fig 5.

Fig 6.

STORING: If your sanitation practices are good, you can store this yeast for months. The yeast should remain in these jars, sealed and refrigerated, until you are ready to make a yeast starter to awaken them. It would also be a good idea to mark these jars with the yeast name, the date, and R1, for “reuse #1”, This way you can keep track of how many times you have re-used this yeast. See Fig 7. Typically after repeated uses the yeast will begin to mutate and its characteristics may change to a degree. You can typically feel confident re-using yeast 4-5 times before degradation is detected.
Fig 7.

RE-USING: When you would like to re-use this strain of yeast, simply allow a single jar of washed yeast to gradually warm to room temperature, decant the liquid and pitch the washed slurry from the bottom of the jar into some new starter wort. See how to make a yeast starter HERE.
IMPORTANT NOTES:
- You can NEVER be too careful with sanitation when it comes to yeast washing/storing.
- Do use a large clear glass container (large flask or 1 gal. carboy) for the HARVESTING and WASH steps in the process.
- Ball or Mason jars make excellent containers for the WAIT and STORAGE steps in the process.
- Be sure to sanitize the jar lids before securing them and storing your yeast.
- Mark your jars with the yeast name, the date and the reuse/generation number (R1, R2,…) and so on to keep track of how many times you have washed this yeast and re-used it.
Update 11/12/2011: Check out the article on Bad Batches to see why you might want to avoid re-pitching yeast, or if you do so, make sure to understand the risks involved.


32 Responses to “Yeast Washing 101”
thank you so much–this was well explained and illustrated–I’ve tried to find info on this and you nailed it
thanks
By Jamie on Feb 9, 2010
Thanks, I appreciate the props. Yeast washing is very easy, it is economical and it adds another dimension to the hobby. I am glad that you enjoyed the article! I enjoyed writing it as well.
By Rob on Feb 10, 2010
Are you using Starsan to sanitze everything, or are there any other products or special procedures that need to be used?
By Mike on Feb 15, 2010
Yes, I go with Starsan and have not had any issues. I personally don’t like bleach solutions or iodine solutions. Some people use a torch to burn the lip of the glass, I find this to be dangerous and unnecessary.
By Larry on Feb 20, 2010
Hello
So what do you think about harvesting after the secondary rather than the primary, as John Palmer alludes to (howtobrew)? – Otherwise with the same process as described above.
Thank you for the resource
th
By Thomas on Mar 28, 2010
The yeast is much more active in the primary. I harvest yeast from the primary. You could still harvest from the secondary, but you will get less yeast and they might not be as potent.
Thanks for the question and the feedback!
By Larry on Apr 4, 2010
Thanks for the info! I am definitely going to try this!
By Sam on Apr 17, 2010
You said you get about 2-4 jars of yeast. When it’s time for re-use and make a starter do you use all jars or just one.
By zepeda on Jun 2, 2010
I use one jar to kick off a yeast starter.
By Larry on Jun 2, 2010
You mention the yeast will last for “months”, would this be “per rewash”? IE, does reuse #2-4/5 need to all happen within these “months” or on the flip side, once you move on to wash/reuse #2, you get “months” again for that jar? Meaning every time you used the yeast (starter+brew+ferment+rewash), you’d get more “months” out of that particular jar? FYI I just washed for the first time today. :)
By Josh on Aug 1, 2010
Yes, once the yeast is activated, it can be stored again in a jar in the fridge for 3-6 months, (starter+brew+ferment+rewash) as you put it. In theory, you could brew every three to six months off the same strain for a year or more.
Many new yeast cells are spawned during fermenation. There will be a very high concentration of healthy yeast cells at the end of the fermentation, and these are the ones that get saved. I would not push storing the yeast past 6 months. A sniff test can confirm if your yeast has gone bad, it should not smell rotten, or like dung.
Ather thing that comes into play is the number of generations the yeast have cycled through. I have gone as high as 3 generations without any trouble. I have heard/read it is possible to go a lot longer. Normally I get tired of the same strain and want something new. With yeast re-use it can be hit or miss, so only store yeast you know came from a healthy fermenation.
Another way to save yeast is to freeze it. That makes it last a lot longer, but requires more effort. We will have an article on long term yeast storage, or yeast banks, sometime in the future.
By Larry on Aug 1, 2010
Thx Larry for the prompt/detailed reply & sounds good. BTW the yeast I washed last night look great and sound asleep today!
By Josh on Aug 2, 2010
Have you used mr malty’s pitching calculator with this? If so what settings do you go by on the thickness and nonyeast percentage? Thanks for the great and simple info.
Also, I typically don’t use a secondary. Any thoughts as to how long I can keep a beer in the primary and still be able to wash the yeast after transferring? Sometimes I leave it for a month or longer.
By Nikobrew on Oct 26, 2010
Niko,
I have not used Mr Malty. I always make a 2 pint starter if I’m re-activating from washed yeast that has been in the fridge.
As for saving yeast off the secondary, 3 weeks is my max. I once went five weeks to let the yeast settle out in the primary. The 5 week batch was very clear and tasted great. The batch that I pitched into ended up being cloudy. It was so much yeast it fermented in under 24 hours. In retrospect, I should have racked off that beer.
By Larry on Nov 6, 2010
Thanks for all the advice. Just used my stirstarter for the first time.
I am planning on racking to the secondary in a few days and was going to try to save the yeast for the first time. I had 2 questions. Are you using pint size jars for the wait and storage steps and are you tightening the bands all the way down? Is there any risk on ongoing fermentation neccessitating leaving the lids loose? Thanks again for all your help.
By Stephen on Jan 9, 2011
Hi Stephen,
I use half pint ball jars. I screw the bands down all the way. I have never had a problem with pressure inside the jars. I can usually get two good half pint jars from the yeast cake of a five gallon batch of beer.
By Larry on Jan 9, 2011
Great guide. The one thing I would say is that you can comfortably re-pitch yeast up to 10 times. A couple of pro brewers I’ve talked to will re-pitch all of their yeast 10 times because they do not experience off flavors until 15 re-pitches +/- 2 or 3.
By Hop on Jan 21, 2011
I personally have only gone 3-4 times re-pitching. Mostly because I want to try out new strains. I was told Deschutes only re-pitches four times. Make sure to only re-pitch healthy yeast from a good batch.
By Larry on Jan 21, 2011
I have been washing yeast in a very similar way for probably 10 years with great success. Can I add a few helpful steps?
1 when you boil your water for your washing add a pinch of Fermax yeast nutrient.
2 when you store your jars. Put them in a cardboard box to keep them out of the light and the temp fluctuations from the fridge will be decreased quite a bit.
Cheers
By Jaybird on Mar 14, 2012
Hey, how are you? Has anybody been using conical fermenters and been harvesting directly off the bottom of them at racking time? It seems to me that after a proper cleaning and sanitizing of the ball valve one would only have to dump all of the trub/hop material and then directly fill sanitized jars, place on your pre-boiled lids, and to the fridge they go. I specially like the idea of keeping them in a box away from light. thanks everyone for the instruction, this lesson makes me go hmmmmm.
By John on Apr 17, 2012
Conical fermentors are awesome, but they are spendy. This is how the pro’s do it.
By Larry on Apr 19, 2012
I’m wondering if instead of storing it in the jars, you could pour off most of the liquid and store it in the “baby soda bottle” test tubes like White Labs uses. Sure would save on space.
By Tim on Aug 22, 2012
The more yeast harvested the better in my opinion. Those test tubes contain the bare minimum yeast cel count for a 5 gallon batch below 1.060 OG.
By Larry on Aug 24, 2012
I’ve repitched several times, but never more than once on the same yeast. My first couple of times were way less scientific or sanitary. The first time I did it, years ago, I just dumped my yeast cake into another bucket, and poured my wort in. Ferment took off very quickly, but that batch had a LOT of trub. What a surprise. I definitely wouldn’t do it that way now. I’ve washed with a very similar practice and repitched on several batches, always with great results.
Thanks for all this info. Next time will be even better with all of your suggestions. Plus I had no idea I could keep it as long as you say. I always figured two weeks was pushing my luck.
By Joe on Apr 27, 2021
Hi, very interesting forum, thanks !
How about keeping a bit of the starter for a next batch instead of taking it from tbe cake ?
By Mathieu on Sep 29, 2021